A Galaxy phone or tablet can develop a problem at exactly the wrong time: charging becomes unreliable, a screen starts misbehaving, a camera refuses to focus, or a battery concern turns into a daily annoyance. Before choosing a repair route, it is sensible to establish one basic fact: whether the device is still covered by its warranty.
Samsung provides more than one way to find that information. The most direct option is a dedicated area in Settings on devices using One UI 9. Older Galaxy hardware or devices on earlier software can use the Samsung Members app, while Samsung’s online device portal is the fallback when the on-device options do not display the necessary details.
The important distinction is that a warranty-status check tells you what Samsung records for the device’s coverage type and expiry date. It is not, by itself, a diagnosis or a guarantee that every issue will qualify for service. Still, checking it first can make the next step—troubleshooting, arranging a repair, or submitting documentation—considerably clearer.
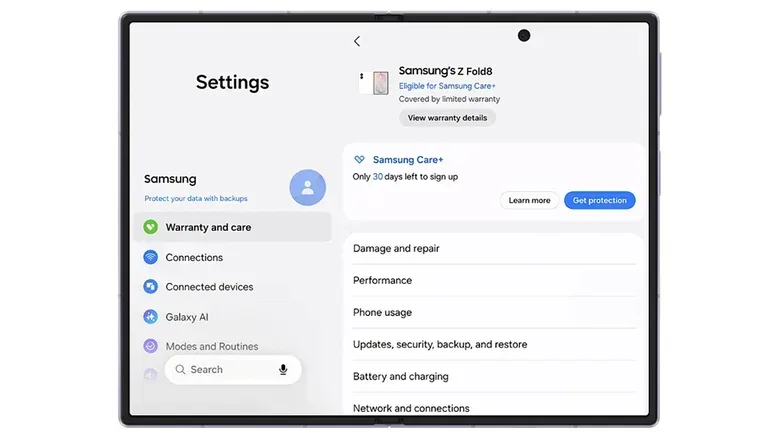
The fastest option on One UI 9: Warranty and care
On a Galaxy phone or tablet running One UI 9, open Settings and choose Warranty and care. Samsung has placed several closely related support tools in this one location:
- warranty information;
- device diagnostics;
- repair options; and
- Samsung Care+ coverage and enrollment information.
At the top of the page, look for the device’s warranty entry. It should identify the coverage type and the expiration date. Those are the key details to note before exploring repair choices. If several Galaxy products are associated with the same Samsung account, their information may appear here as well, which is useful for people who manage more than one phone or tablet.
“Coverage type” is worth reading rather than treating as background text. It identifies the category of coverage Samsung has associated with the device, while the expiration date is the date the menu presents for that coverage. The screen can also show Samsung Care+ information, including enrollment details. That is separate information from the basic warranty listing, even though the menu puts both in the same support-oriented place.
Use diagnostics as a clue, not a replacement for the coverage check
The Warranty and care menu also includes built-in diagnostics for several pieces of hardware: the battery, charging system, display, camera and sensors. This makes the menu practical when a problem is specific but hard to describe. Rather than jumping immediately from “something seems wrong” to a repair search, an owner can first see whether the device flags an issue in the relevant area.
A diagnostic is an automated device check. In this context, it is intended to examine supported hardware functions and potentially identify a problem. A flagged result can then lead into the repair options available from the same menu. The flow is straightforward:
Related coverage includes How to Check Warranty Coverage on a Samsung Galaxy Phone or Tablet.
- Confirm the listed warranty details.
- Run the diagnostic most relevant to the symptom.
- Review any issue the device flags.
- Use the repair options presented in the menu if they are needed.
The menu also offers Bixby troubleshooting assistance. That may be useful for basic guidance, but it should not distract from the more concrete details on the page: the recorded coverage information, the diagnostic result, and the repair path. For an intermittent issue, it can be helpful to keep the symptom and any diagnostic outcome clear before proceeding.
Galaxy owners dealing with call behavior in a foldable setup may also want to keep software and accessory-related problems distinct from a hardware claim. A separate report on an reported Android Auto calling problem involving closed foldables is a reminder that not every frustrating phone failure has the same cause or solution.
Older Galaxy devices: check through Samsung Members
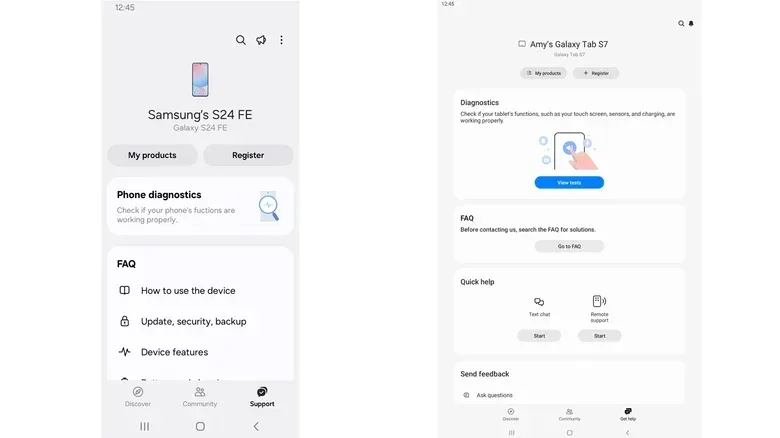
If the device is not on One UI 9, or is too old to receive that version, the principal on-device alternative is Samsung Members. The app is generally preinstalled on Galaxy devices. If it is not present, it can be downloaded from either the Galaxy Store or the Google Play Store.
Once Samsung Members is installed, open it and sign in to the Samsung account associated with the device. Then use the bottom navigation to select Support. On older versions of the app, that section can instead be labelled Get help.
Samsung Members can be used to register the device if registration did not occur automatically during setup, check its status and access support tools. The availability of product and warranty information is not identical in every situation: it can vary by the device, the installed app version and the user’s region. That means two owners following the same basic steps may not see precisely the same set of fields.
If product and warranty information appears in Samsung Members, review the device entry and record the listed status before moving on. If it does not appear, that is not necessarily a sign that the device has no warranty. It means the app is not providing the needed detail in that configuration, and the web portal becomes the better route.
Why registration matters
Registration connects the device to the Samsung account used for support. In practical terms, that can make it easier to locate the product in Samsung Members or online. A Galaxy device may already be registered from its initial setup, but this should not be assumed—especially if the device is missing from the account’s product list.
If registration is required, be prepared to identify the device. Samsung may request a serial number or an IMEI. An IMEI is a device identifier used for a phone; Samsung’s instructions also direct tablet owners to the device information area when they need identifying details. Avoid confusing these identifiers with a model name. The model tells you what kind of device it is, while a serial number or IMEI is used to identify the specific unit for registration purposes.
Use Samsung’s online portal when the app is not enough
Samsung’s online devices portal is the most useful fallback when Settings does not offer Warranty and care and Samsung Members does not surface the coverage details. Sign in with the Samsung account connected to the device, then go to My Products.
If the Galaxy device is already registered, its warranty status can be checked from that product listing. If it is not registered, complete registration first. Samsung may ask for the serial number or IMEI as part of that process.
Both identifiers can be found on the device itself:
- On a phone, go to Settings > About phone.
- On a tablet, go to Settings > About tablet.
This route is also useful when the device can still connect to the internet but the local support screens are unclear. It separates the question of account registration from the question of coverage: first make sure Samsung can identify the device in the account, then review the warranty status attached to that product entry.
If the expiration date looks incorrect
A date displayed in an account or device menu is only useful if it is accurate. If Samsung shows an expiration date that does not look right, look for Review Warranty or an option labelled submit a warranty dispute. Samsung provides this path for owners to send proof of purchase so the date can be reviewed and corrected if appropriate.
Proof of purchase is particularly important here because it supports the request to revise the recorded warranty information. Keep the documentation accessible before beginning the dispute process rather than relying on a memory of the purchase date. The purpose is not to diagnose the fault; it is to make sure Samsung has the correct coverage date on record.
A practical order of operations before seeking repair
For a Galaxy phone or tablet with a suspected hardware issue, the least complicated path is usually to start with the newest support interface available on that device.
- Check the software route first. On One UI 9, open Settings and select Warranty and care.
- Read the exact warranty listing. Note both coverage type and expiration date.
- Run the relevant diagnostic. Use the battery, charging, screen, camera or sensor check that corresponds to the observed problem.
- Review repair options. If the device flags an issue, the same One UI 9 menu can direct you toward repair choices.
- Try Samsung Members on earlier software. Sign in, select Support or Get help, and register the device if needed.
- Move to the online portal if necessary. Find the device under My Products after signing in, using its serial number or IMEI for registration when required.
- Dispute an apparently wrong date. Use Review Warranty or the warranty-dispute option and provide proof of purchase.
This sequence avoids a common source of confusion: treating the support app, the web portal and the warranty record as unrelated systems. They are different routes to related account and product information. The right choice depends mainly on the software version and on whether the device is already visible under the Samsung account.
For One UI 9 users, the new Settings location is the most direct all-in-one starting point because it combines status, diagnostics and repair options. For everyone else, Samsung Members remains the first alternative, with the web portal providing a dependable method when the app does not show warranty details. And if the record itself is the problem, the warranty-review process and proof of purchase are the appropriate next steps.