
Ace Attorney Investigations: Miles Edgeworth — Nintendo DS (USA) Complete Campaign Walkthrough
Step through all five linked episodes of Ace Attorney Investigations: Miles Edgeworth (Nintendo DS, USA).

Find a copy
Ace Attorney Investigations: Miles Edgeworth Nintendo DS
We may earn a commission if you buy through these links, at no extra cost to you. As an Amazon Associate I earn from qualifying purchases.
Opens retailer search results. Check the model, edition, seller, availability and current price before buying.
Before you begin
You are about to play Ace Attorney Investigations: Miles Edgeworth on the original Nintendo DS (USA).
This walkthrough is written specifically for the DS cartridge/interface and assumes the game is being played on the DS hardware or an accurate DS‑mode emulator that preserves touchscreen and D‑pad controls.
The guide leads you case‑by‑case through every investigation and rebuttal phase to reach the game's true ending, explains the DS‑specific systems (Logic Mode, Little Thief holograms, Truth Gauge), and gives recovery steps so you can continue even if you make mistakes.
Follow the chapters in order.
Each case is treated as a sequence of investigation segments (explore scenes, collect evidence, use Logic Mode to connect thoughts) followed by rebuttal segments (confront characters and present contradictions).
Save regularly in multiple slots before key rebuttals, use the bottom touchscreen to inspect the map and hotspots, and consult the per‑case chapter for exact objective order and the completion check for that episode.
Set yourself up for the run
Confirm you are using the Nintendo DS North American cartridge or a DS system with the correct region software.
The guide references DS controls and touch interactions as present on the original release.
Controls: familiarize yourself with direct character movement via the D‑pad and touchscreen map, the touchscreen cursor for examining objects, and the Logic Mode interface (connecting thoughts).
If using a stylus, keep it handy; if using a D‑pad only, expect slower navigation.
Make a set of backup save slots.
Save before each rebuttal phase and before entering any branch where the Truth Gauge may drop significantly.
Enable any in‑game options that show item names or map markers (default DS settings are fine).
If you have limited play sessions, note checkpoint behaviour: clearing an investigation segment restores part of your Truth Gauge; clearing an episode restores it fully.
Keep a notepad (physical or digital).
The game expects you to track links between witnesses, evidence and deductions; writing down apparent inconsistencies can speed logic deductions.
Expect tutorial coverage in Episode I — use it to learn how to connect thoughts and use Little Thief holograms.
Do not skip tutorial messages until you understand how to make deductions and present contradictions.
If you plan to consult other references during play, use them only if you are stuck; many rebuttal puzzles reward re‑reading lines and re‑examining evidence rather than trial‑and‑error presenting.
Battery and save hygiene: on original DS hardware, ensure your system battery is charged and the cartridge contacts are clean before long sessions.
Edition notes, interface and how to use this guide
This chapter establishes the Nintendo DS North American reference version of Ace Attorney Investigations: Miles Edgeworth and explains how to follow the campaign without importing mechanics, controls, or episode names from the sequel or later Ace Attorney Investigations Collection. The original DS game contains five connected episodes: Turnabout Visitor, Turnabout Airlines, The Kidnapped Turnabout, Turnabout Reminiscence, and Turnabout Ablaze. Play them in that order, beginning with Turnabout Visitor, which introduces direct movement, Logic, evidence handling, deductions, partner conversations, and rebuttals.
Confirm the correct edition before starting
Use the North American Nintendo DS release of Ace Attorney Investigations: Miles Edgeworth, released on February 16, 2010, or a DS-compatible setup reproducing that edition. This chapter refers to the original dual-screen interface, including the D-pad, DS buttons, stylus, microphone-supported commands, and the original English evidence and episode names.
The campaign route is Turnabout Visitor, Turnabout Airlines, The Kidnapped Turnabout, Turnabout Reminiscence, and Turnabout Ablaze. These are the five episodes in the first Investigations game. The Inherited Turnabout, The Forgotten Turnabout, and The Grand Turnabout belong to Ace Attorney Investigations 2: Prosecutor’s Gambit and must not be substituted for the first game’s cases.
Do not apply controls or menu features from the later Ace Attorney Investigations Collection. The collection uses a modern single-screen control scheme and adds presentation features that are not part of the North American DS cartridge. Start with Turnabout Visitor instead of trying to bypass it. The opening episode teaches the investigation structure and introduces the systems used throughout the remaining cases.
- Confirm that the title is Ace Attorney Investigations: Miles Edgeworth for Nintendo DS.
- Use the North American English release or a compatible setup reproducing that release.
- Begin with Turnabout Visitor.
- Do not confuse the first game with Ace Attorney Investigations 2: Prosecutor’s Gambit or the later collection.
Use the original DS controls
During an investigation, use the D-pad to move Edgeworth, move the cursor, and select menu commands. A confirms a selection, examines an object, talks to a character, or advances dialogue. B cancels, returns through menus, and goes backward through available testimony statements. Hold B while moving with the D-pad to make Edgeworth run.
Press L to open the Logic screen during an investigation. In a rebuttal, L presses the current statement for additional information. Press R to open the Organizer and switch between evidence and profiles. Press X to present evidence during a rebuttal, connect two Logic entries, or use Deduce when an examination scene provides that command.
Y opens the partner screen during applicable investigation sections. In scenes that support it, holding Y activates the DS microphone command. Y is not a universal screen-switch button; use it only when the current situation displays or permits its partner or microphone function. Start opens the save screen. Select is not needed for ordinary gameplay.
The touchscreen provides equivalents for these actions. During movement, the lower screen shows the navigation controls and area map or map-like movement display, while the upper screen shows the active scene. You may move with the D-pad or use the stylus movement controls on the lower screen. Use the on-screen Examine, Logic, Partner, and Organizer controls when the game displays them.
- Use the D-pad for movement, cursor control, and menu selection.
- Use L for Logic and statement pressing.
- Use R for the Organizer and its Evidence and Profiles files.
- Use X for presenting evidence, connecting Logic, and Deduce where available.
- Use Y for partner interaction or microphone-supported commands.
- Use Start to open the save screen.
Understand the five-episode route
On a new campaign, begin with Turnabout Visitor. After an episode is completed, the next episode becomes available from the game’s main menu. The menu may also display cleared episodes for replay, with their completed presentation or background. This is useful for revisiting a case, checking which episodes have been cleared, or returning to earlier scenes, but it is not the required proof that the entire campaign is complete.
For a normal first playthrough, continue from the active save rather than selecting a previously cleared episode. Replaying a cleared episode is separate from advancing the campaign file. Do not stop when a new episode becomes available: that only confirms that the preceding episode has ended and the next case can be started.
The fourth episode, Turnabout Reminiscence, is presented fourth even though much of its story occurs earlier in the chronology. Follow the menu order and the guide’s route rather than rearranging episodes by story date. The fifth episode, Turnabout Ablaze, completes the game’s connected smuggling-ring storyline.
- Play Turnabout Visitor first.
- Continue through Turnabout Airlines, The Kidnapped Turnabout, Turnabout Reminiscence, and Turnabout Ablaze.
- Use cleared-episode access for replay only.
- Do not treat a newly unlocked episode as campaign completion.
Read the guide’s investigation directions
A direction beginning with Move means select the named destination from the movement choices or travel display. Examine means inspect the named object, character, or hotspot. Talk means select the specified conversation topic and allow it to finish. Present means open the Organizer and show the named evidence or profile when the current character or screen permits it.
Logic means press L, select the two named Logic entries, and choose Connect with X or its touchscreen equivalent. Use only the pair listed in the guide. Incorrect connections reduce the Truth Gauge, so do not test random combinations when the gauge is low. If the guide tells you to inspect an evidence item, open it in the Organizer and check every available detail before leaving it.
Deduce is different from ordinary presenting. During a close examination, select the highlighted or contradictory area, choose Deduce, and then present the evidence specified by the guide. Some objects can be rotated or examined in detail, but not every evidence item has an interactive 3D inspection.
Little Thief reconstructions are marked separately. When Kay’s device becomes available, follow the prompt to open the reconstruction, inspect the represented scene, and examine the newly revealed object, position, or action required by the current objective. Do not assume that every visible detail is optional; the reconstruction often advances only after the relevant detail is examined.
For a rebuttal, read the whole testimony before presenting evidence. Move through the individual statements, press a statement when the guide calls for it, and identify the exact line contradicted by the evidence. Present the item that directly disproves that line. A piece of evidence that is generally related to the subject is not automatically the correct answer.
- Follow the listed location order unless a detour is explicitly allowed.
- Connect only the named Logic pair.
- Inspect required Little Thief details and close-up evidence features.
- Press statements when instructed before presenting evidence.
- Match evidence to the exact contradictory statement.
Use multiple saves before risky sequences
Keep one routine save for current progress and a second backup save for major transitions. Save after completing an investigation segment, obtaining an important item, or finishing a long conversation. Before a rebuttal or a sequence containing several Logic connections, create a separate save once the game permits it. This gives you a clean retry point if an evidence presentation, deduction, Logic connection, or answer is wrong.
The Truth Gauge decreases when Edgeworth makes incorrect deductions, presents incorrect evidence, or otherwise fails during a rebuttal. If the gauge becomes dangerously low, reload the pre-sequence save instead of continuing to guess. Re-read the testimony, inspect the relevant Organizer entries, and retry only after identifying the direct contradiction.
Successful investigation progress restores the gauge according to the game’s checkpoint structure, and an episode’s completion provides a full recovery for the next stage. Those recoveries are safety nets, not a reason to spend the gauge on random attempts. Keep the backup until the next investigation section has been completed and saved.
After Turnabout Ablaze ends, preserve at least one save representing the completed campaign. Do not overwrite that file immediately with a new playthrough. The final ending sequence and credits, rather than an episode-menu display alone, are the completion milestones used by this guide.
- Maintain a routine save and a separate backup save.
- Save before major rebuttals and complicated deduction sequences.
- Reload after repeated errors or a dangerously low Truth Gauge.
- Keep the backup until the next stable checkpoint is saved.
- Preserve a completed-campaign save after the final episode.
Follow the completion standard
The remaining chapters use Investigation for movement, examination, conversations, Logic, deductions, Little Thief reconstructions, and evidence collection. Rebuttal sections cover testimony, pressing statements, presenting contradictions, and any follow-up choices. When the guide names evidence, profiles, Logic entries, or a location, use the original DS wording shown in your Organizer and dialogue.
To complete the campaign, clear all five episodes in the original order, finish Turnabout Ablaze, allow the final resolution and epilogue to play, and watch the credits. Then save the completed file in a protected slot. Optional dialogue and replayed cases can be handled afterward.
If you need to verify progress before the ending, use the cleared-episode presentation on the main menu as a secondary indication only. The definitive completion check is that all five episodes have been completed and the final epilogue and credits have been viewed.
- Clear Turnabout Visitor.
- Clear Turnabout Airlines.
- Clear The Kidnapped Turnabout.
- Clear Turnabout Reminiscence.
- Clear Turnabout Ablaze.
- Watch the final resolution, epilogue, and credits.
- Preserve a completed-campaign save.
Before you move on
- The game is the North American Nintendo DS original or a compatible setup reproducing that edition’s interface.
- The player recognizes the five correct episodes: Turnabout Visitor, Turnabout Airlines, The Kidnapped Turnabout, Turnabout Reminiscence, and Turnabout Ablaze.
- The player knows the DS controls for movement, Logic, the Organizer, evidence presentation, partner interaction, deductions, and saving.
- A separate backup save exists before major rebuttals and long deduction sequences.
- All five episodes have been cleared.
- The final resolution, epilogue, and credits have been viewed.
- A completed-campaign save has been preserved for replay or archival use.
References for this chapter
- Ace Attorney Investigations: Miles Edgeworth – Spoiler-Free Walkthrough by MKaykitkats, Nintendo DS
- Ace Attorney Investigations: Miles Edgeworth – Spoiler-Free Walkthrough by Shotgunnova, Nintendo DS
- Ace Attorney Investigations: Miles Edgeworth - Guide and Walkthrough - DS - By Burner
- Ace Attorney Investigations: Miles Edgeworth – Controls
- Ace Attorney Investigations: Miles Edgeworth – Strategy Guide and Walkthrough
- Ace Attorney Investigations: Miles Edgeworth – Nintendo DS Screenshots
- Ace Attorney Investigations: Miles Edgeworth DS save-game listing, North American version
Core mechanics: movement, Logic Mode, Little Thief and the Truth Gauge
Ace Attorney Investigations: Miles Edgeworth on the original Nintendo DS combines free movement around crime scenes with direct examination, evidence management, Logic deductions, Little Thief reconstructions and rebuttal sequences. The game does not use a conventional courtroom investigation layout: Edgeworth moves through the current scene, examines specific objects, talks to people and connects the thoughts he has gathered. Careful reading is more reliable than trial-and-error, because incorrect deductions and evidence presentations reduce the Truth Gauge.
Move through the current scene and use the DS map correctly
During an investigation, move Edgeworth with the D-pad, or use the stylus on the movement map displayed on the lower screen. Sliding the stylus across that map directs Edgeworth through the current area; it is not simply a menu of destination icons. The lower screen also contains the commands for opening Logic, talking to the current partner and examining objects. The button layout is different during conversations and close-up examinations, so follow the command labels that appear on the screen rather than assuming the movement controls remain active.
Use the movement controls to sweep across the entire visible area. When Edgeworth is positioned in front of an examinable object, the Examine command becomes available. Press A, or touch the Examine command, to inspect it. Examination may produce evidence for the Organizer, a profile, a new Logic thought or an updated description for an item already collected. A scene can also contain harmless objects and optional dialogue, so do not assume that only the most conspicuous object matters.
To speak with the current partner, press Y or touch the partner panel. To change locations, use the available movement command when the story has opened another location; the game presents the valid route as the investigation progresses. If no new route is available, return to the current scene and check people, close-up views and newly examinable objects instead of searching for an undisplayed map icon. The DS control layout and movement functions are documented in the contemporary walkthrough material for this release.
- Use the D-pad or slide the stylus across the lower-screen movement map.
- Walk around the whole current scene before assuming that progress is blocked.
- Examine objects only after the Examine command appears.
- Talk to every available character and exhaust newly opened topics before leaving.
- Recheck the scene after major dialogue because new examination points can become available.
Review the Organizer before presenting evidence
Open the Organizer with R or by touching its panel on the lower screen. It contains evidence and profiles gathered during the episode. Read each new evidence description carefully, including details about location, damage, timing, ownership or quantity. Evidence descriptions can be updated after a deduction or close examination, and those updates may provide the fact needed for a later rebuttal.
When a testimony or conversation calls for a contradiction, read the entire statement block first. The correct presentation is tied to a particular claim, not merely to a shared subject. For example, an item connected with a room may be irrelevant to a statement about what happened inside that room if its description does not contradict the exact wording. Pressing a statement can reveal additional information, add a new statement or change the evidence needed, so press before presenting whenever the game offers the option.
The DS button layout assigns X to presenting evidence during investigation and rebuttal functions, while R opens the Organizer. The touchscreen provides the same commands through the visible panels. Save with START before a long rebuttal or a deduction sequence with several possible answers.
- Read every new evidence description immediately.
- Compare the exact testimony sentence with the evidence description.
- Press statements before presenting when the option is available.
- Save with START before a major rebuttal or multi-stage deduction.
Use Logic Mode to connect collected thoughts
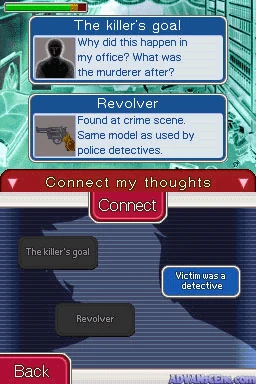
Edgeworth records important observations as Logic thoughts. Open Logic Mode with L or by touching the Logic panel. The screen lists the thoughts currently available; select two thoughts that directly explain the same unresolved question, then confirm the connection. A successful connection creates a conclusion and may add evidence, update an existing item, open a new conversation or reveal the next investigation action. The game’s early tutorial demonstrates this by connecting the office crime scene with the office key to ask why the locked office was entered.
Do not connect thoughts merely because they concern the same person or location. Look for a direct relationship: an object and the fact that identifies its owner, two observations that imply a missing event or a physical detail that conflicts with the current reconstruction. If the pairing is rejected, the Truth Gauge is penalized. Stop guessing, reread both thoughts and inspect the Organizer before trying again.
Logic is also the first recovery tool when the investigation appears stalled. Revisit the map, talk to the partner and examine any newly available hotspot. Then reopen Logic Mode and check whether the new fact completes a pairing. Successful deductions often alter the scene or add a new evidence detail, so inspect the result before attempting another connection.
- Open Logic after gathering several new observations.
- Select two thoughts that answer the same specific question.
- Review the result of every successful connection.
- If a pairing fails, stop guessing and search for a missing fact.
Use Little Thief when the story activates it
Little Thief is Kay Faraday’s reconstruction device. It is available only during designated investigation sequences; it is not a freeform search mode that can be activated at every scene. When the Little Thief option appears, enter the reconstruction and examine the recreated location as you would a normal crime scene.
Move the cursor or Edgeworth through the hologram and inspect objects that differ from the established account. The reconstruction may display a position, object or event that is impossible under the current explanation. When the game asks for an update, select the evidence or fact that directly accounts for that inconsistency. A successful update changes the hologram and can reveal a concealed object, add a Logic thought or open the next line of investigation.
If the reconstruction does not advance, leave it and inspect the Organizer, Logic list and current scene for a missing prerequisite. Little Thief reveals information from facts already gathered; it does not replace the ordinary process of examining locations and questioning witnesses. Updated reconstructions can expose details that are unavailable in the initial version of the hologram.
- Enter Little Thief only when its command is available.
- Inspect the hologram systematically rather than tapping randomly.
- Use the fact that explains the visible inconsistency when updating it.
- If no progress occurs, search for the missing evidence outside the reconstruction.
Protect and recover the Truth Gauge
The green Truth Gauge measures how far Edgeworth is from establishing the truth. Incorrect evidence presentations, failed Logic connections and wrong choices reduce it. In the first Nintendo DS game, the gauge is a shared resource for the current episode rather than a separate health bar for each individual statement. Treat every penalty as permanent until a recovery point is reached.
If the gauge reaches zero, the game enters its failure sequence and the truth is lost for that attempt. Reload the latest save rather than continuing to test random evidence. A completed investigation phase restores half of the Truth Gauge, and completing an entire episode restores it completely. These recovery rules make investigation checkpoints valuable, but they do not make blind guessing safe before the next checkpoint.
Before a rebuttal, reread the testimony and identify the precise sentence that conflicts with a specific evidence description. During the rebuttal, press statements for details and present only when the contradiction is clear. If the gauge becomes dangerously low, reload the pre-rebuttal save, inspect the most recent scene again and review the evidence rather than spending the remaining gauge on possible answers.
- Save before entering a major rebuttal.
- Do not test several plausible evidence items in succession.
- Use completed investigations as the normal half-gauge recovery point.
- Expect a full restoration when the episode is cleared.
- Reload a pre-rebuttal save if the gauge is low or a presentation was uncertain.
Before you move on
- You can move Edgeworth with the D-pad and direct him with the stylus-controlled lower-screen movement map.
- You can recognize when the Examine command is available and inspect objects, people and close-up scenes.
- You can open the Organizer, read evidence descriptions and match a specific contradiction to the correct statement.
- You can open Logic Mode, select two related thoughts and confirm a deduction without relying on random pairings.
- You can enter Little Thief when prompted, inspect the reconstruction and update it with the fact that resolves its inconsistency.
- You understand that incorrect deductions and presentations reduce the Truth Gauge, that completing an investigation restores half of it, that completing an episode restores it completely and that reaching zero causes a failure sequence.
References for this chapter
- Ace Attorney Investigations: Miles Edgeworth – Spoiler-Free Walkthrough by MKaykitkats, Nintendo DS
- Ace Attorney Investigations: Miles Edgeworth – Guide and Walkthrough by The_Lost_Gamer, Nintendo DS
- Ace Attorney Investigations: Miles Edgeworth, Wikipedia
- Ace Attorney Investigations: Miles Edgeworth — Truth Gauge and Little Thief mechanics summary
- Ace Attorney Investigations: Miles Edgeworth — Penalty and Truth Gauge reference
Episode I — Turnabout Visitor: investigation flow and core tutorial
Turnabout Visitor begins in Edgeworth's office, where the Nintendo DS version teaches movement, examination, Logic, Deduction, the Organizer, and rebuttals. Search the office methodically, connect the required thoughts, restore the files, and obtain Stolen File before challenging Portsman's first accusation. Little Thief does not appear in this episode; its absence is normal and does not indicate a missed investigation branch.
1. Complete the opening Logic tutorial
After the opening scene, Edgeworth returns to High Prosecutors' Office, Room 1202, and discovers Detective Buddy Faith's body. The game adds Crime Scene: My Office and The Office Key to the Logic screen. Open Logic with L, or tap the Logic button on the touchscreen, select both thoughts, and press X or tap Connect. The result is The Killer's Goal.
This is the first required Logic connection. It establishes that the murder in Edgeworth's locked office was not necessarily coincidental and that the investigation must determine what the intruder wanted. Read the tutorial messages because they explain the DS interface used throughout the episode.
For button controls, A examines or confirms, B cancels, the D-pad moves Edgeworth or the cursor, L opens Logic, R opens the Organizer, X performs Connect or Deduce, and Start opens the save screen. Holding B while pressing the D-pad makes Edgeworth run. The same actions can be performed with the stylus.
- Connect Crime Scene: My Office with The Office Key.
- Confirm that The Killer's Goal appears in Logic.
- Save after free movement begins.
2. Search the body, weapon, and fallen files
Examine the revolver on the floor. Gumshoe identifies it as the same model issued to precinct detectives, adding Revolver to Logic. Examine the wallet or badge beside the victim's hand to identify Buddy Faith as a detective; this adds Victim Was a Detective to Logic.
Inspect the body to receive Crime Scene Notes. These notes record the gunshot wound and the body's position. Then examine the fallen files to receive Signs of a Struggle. The files are not merely background decoration: their disorder is required to advance the investigation.
Open Logic and connect Revolver with Victim Was a Detective. Gumshoe checks the victim and finds that Faith's holster is empty. This creates Victim's Revolver in the Organizer. Open the Organizer with R and examine the revolver when prompted. Inspect its cylinder or ammunition chambers. Only one bullet has been fired, a fact that becomes important when a second bullet hole is found.
- Examine the floor revolver.
- Inspect Buddy Faith's badge or wallet.
- Examine the body and obtain Crime Scene Notes.
- Examine the fallen files and obtain Signs of a Struggle.
- Connect Revolver with Victim Was a Detective.
- Inspect Victim's Revolver and confirm that one bullet was expended.
3. Examine the fallen frame and secret safe
After Jacques Portsman arrives, examine the fallen frame containing Edgeworth's prosecutorial jacket. In the close-up view, point to the bullet hole and choose Deduce with X or the touchscreen. Present Victim's Revolver. The revolver fired only once, but the scene contains the shot that killed Faith and the shot that struck the frame. The game adds Another Handgun to Logic.
The deduction also reveals Edgeworth's secret safe. Examine the safe to add Secret Safe to the Organizer, then examine the keypad. The surrounding safe is dusty, but the keypad has been wiped clean. This adds Wiped Fingerprints to Logic.
Do not leave the office before checking the safe and keypad. The keypad investigation is required for the theft deduction. If the scene seems stalled, check Logic and confirm that Another Handgun and Wiped Fingerprints have been added.
- Examine the fallen frame.
- Deduce on the bullet hole.
- Present Victim's Revolver.
- Examine the secret safe.
- Examine the keypad and obtain Wiped Fingerprints.
4. Link the theft motive and restore the files
Open Logic and connect The Killer's Goal with Wiped Fingerprints. The result is Motive: Theft (?). Then connect Motive: Theft (?) with Signs of a Struggle. The game concludes that the disorder may have resulted from someone searching the office rather than from a simple fight.
Gumshoe restores the files to their original positions. Once they are back on the shelves, inspect the low bullet hole in the bottom row of binders. Choose Deduce and present Crime Scene Notes. The bullet hole does not match the body's recorded position while the files are arranged as they currently stand.
When asked what is wrong, choose the file order rather than the body position or the handprints. Restore the binders to the numbered order shown by the game. This reveals that the files were rearranged twice, once before and once after the murder. The game adds Files in Disarray to Logic.
- Connect The Killer's Goal with Wiped Fingerprints.
- Connect Motive: Theft (?) with Signs of a Struggle.
- Inspect the low bullet hole in the restored files.
- Deduce and present Crime Scene Notes.
- Identify the file order as the problem.
- Restore the files to their correct numbered arrangement.
5. Find the missing binder and end the investigation
After the files are restored, inspect the blood-marked binders at the lower-right portion of the office. The blood writing spells Gumshoe across the files, but one binder is missing. The missing item is added to the Organizer as Stolen File.
The investigation ends once this evidence is found. There is no separate red message hidden behind the body that must be discovered, and there is no Little Thief reconstruction in Turnabout Visitor. Little Thief is introduced later in the game by Kay Faraday, so do not search Episode I for a hologram control or assume that the case is blocked because Kay is not present.
Save as soon as the investigation ends and before beginning Portsman's rebuttal. A normal DS save can be made with Start outside Logic.
- Inspect the blood-marked binders after the files are restored.
- Confirm that one binder is missing.
- Confirm that Stolen File appears in the Organizer.
- Save before Portsman's first rebuttal.
6. Resolve Portsman's first accusation
Portsman argues that Gumshoe stole Faith's gun, killed him, disturbed the files, moved the body, and failed to notice the bloody writing. Allow the complete statement block to play, then review each statement carefully. The required contradiction is the fourth statement, the claim that the killer did not notice the bloody letters.
Select that statement and present Stolen File. A person who removed a binder from the shelf should have noticed the blood writing on the remaining files, so Stolen File directly contradicts Portsman's explanation. Presenting it advances the rebuttal and leads into Portsman's next accusation involving the master key and Maggey Byrde.
Do not present Victim's Revolver against the general accusation simply because it relates to the murder weapon. The game expects the specific contradiction involving the stolen binder. If an incorrect presentation lowers the Truth Gauge, reload the save made immediately before the rebuttal instead of testing several guesses.
- Listen to Portsman's complete first statement block.
- Select the fourth statement about overlooking the bloody letters.
- Present Stolen File.
- Reload the pre-rebuttal save if an incorrect presentation causes serious Truth Gauge loss.
- Continue to the next chapter when Portsman's master-key accusation begins.
Before you move on
- Crime Scene: My Office and The Office Key were connected to create The Killer's Goal.
- The Organizer contains Crime Scene Notes, Victim's Revolver, Secret Safe, and Stolen File.
- Logic has advanced through Another Handgun, Motive: Theft (?), and Files in Disarray.
- The files have been restored to their correct order.
- Portsman's first rebuttal has begun, and Stolen File has been presented against the fourth statement.
- A save exists immediately before the rebuttal or before the master-key continuation.
References for this chapter
- Ace Attorney Investigations: Miles Edgeworth - Guide and Walkthrough - DS - By warfreak
- Ace Attorney Investigations: Miles Edgeworth - Guide and Walkthrough - DS - By Burner
- Ace Attorney Investigations: Miles Edgeworth – Spoiler-Free Walkthrough by MKaykitkats, Nintendo DS
- Ace Attorney Investigations: Miles Edgeworth – Spoiler-Free Walkthrough by Shotgunnova, Nintendo DS
- Turnabout Visitor — Ace Attorney Wiki
Episode I — Turnabout Visitor: rebuttal resolution and troubleshooting
Finish Turnabout Visitor by following the Portsman confrontation in its actual Nintendo DS order. First break down Portsman’s explanation of the stolen file and his suspicion of Maggey. Then investigate the hallway outside Edgeworth’s office, use the Master Key and office-door evidence to expose the office switch, and resolve the final rebuttals. The episode ends after the videotape is examined and Stolen 0-Series File is presented during the closing discussion.
1. Resolve the first Portsman office rebuttals
After the initial investigation in Edgeworth’s office, the game begins a testimony sequence before the hallway investigation. Read each statement fully, but do not spend Truth Gauge points on random evidence. The first testimony is Mr. Portsman’s Logic. Present Stolen File on the fourth statement, the one concerning the bloody writing and the missing file. The blood on the file spines conflicts with the claim that Gumshoe stole the file during the murder because the thief would have had to overlook the visible writing. The contradiction shifts the focus toward someone who stole the file after the writing appeared.
The next testimony is Reason to Suspicion. The game adds Master Key to the evidence during this sequence. Press the first statement about Maggey, then choose the option to ask for more details. Portsman adds a statement claiming that Maggey’s motive was theft. Present Secret Safe against that new statement. The safe was a prosecutor-only secret, so the claim that Maggey independently searched the office does not fit the information already established. The game then moves Edgeworth and the others into the hallway outside his office.
- Present Stolen File on the fourth statement of Mr. Portsman’s Logic.
- Obtain Master Key during Reason to Suspicion.
- Press the first statement and ask for more details.
- Present Secret Safe against the added theft-motive statement.
2. Investigate the hallway outside Edgeworth’s office
In the hallway, examine the binder or file beneath the sofa or bench. Then inspect the doorknob on Edgeworth’s office door. These examinations can be completed in either order, but both are required before the segment ends. Talk to Maggey Byrde and present Master Key. Continue through the newly available conversation topics concerning the key and Portsman’s request. This produces the Logic facts Master Key Was Stolen and Used the Master Key.
Inspect the placard or nameplate on Mr. Portsman’s office door. Combine Master Key Was Stolen with Used the Master Key in Logic Mode. The deduction creates Mr. Portsman’s Office. Use that evidence while examining the doorknob of Portsman’s office. When the game asks which part of the door requires closer examination, choose the option concerning the prints on the doorknob. The prints belong to Portsman and Buddy Faith, not Maggey. Present Maggey Byrde’s profile to establish that the woman who believed she was opening Portsman’s office was actually directed to the wrong door.
Examine the small paper or note sticking out from beneath Portsman’s door to obtain Note Left by Victim. Examine the marks beneath the base of the Basketball Hoop to obtain Basketball Hoop. The hallway segment concludes after the binder, Edgeworth’s doorknob, Portsman’s office-door investigation, Note Left by Victim, and Basketball Hoop have been found or examined. Save when the game offers the opportunity before continuing into the final rebuttals, or keep the preceding save slot intact if you want to retry without losing progress.
- Examine the binder beneath the hallway sofa or bench.
- Talk to Maggey and present Master Key.
- Obtain Master Key Was Stolen and Used the Master Key.
- Combine the two Logic facts.
- Use Mr. Portsman’s Office on the office doorknob.
- Choose the doorknob-print examination and present Maggey Byrde’s profile.
- Obtain Note Left by Victim and Basketball Hoop.
- Preserve a save before the final rebuttal sequence.
3. Expose the office switch in Mr. Portsman’s Rebuttal
In Mr. Portsman’s Rebuttal, press the third statement, the one asking how Portsman could have unlocked Edgeworth’s office. When the game asks how to challenge the statement, choose Raise an Objection. Present Master Key. This establishes the method by which the door could be opened without Portsman appearing to use the key himself.
When Portsman denies handling the key, present Maggey Byrde’s profile. He used Maggey’s actions as part of the deception while making her believe she was opening his office. When the testimony reaches the claim that the wrong room could not have been identified, present Basketball Hoop. The hoop was moved as a landmark, allowing the office nameplates or room positions to be manipulated so Maggey would identify Edgeworth’s office as Portsman’s. Do not treat Master Key, Maggey’s profile, and Basketball Hoop as interchangeable: each answers a different part of the deception.
- Press the third statement in Mr. Portsman’s Rebuttal.
- Choose Raise an Objection.
- Present Master Key.
- Present Maggey Byrde’s profile.
- Present Basketball Hoop.
4. Correct the order in Conjecture’s Rebuttal
Conjecture’s Rebuttal requires two presentations, and the order matters. Press the testimony until the third statement concerns Portsman’s supposed continuous presence in his own office. Present Note Left by Victim on that statement. The note was left by Buddy Faith for Portsman and indicates that Portsman was out when Faith came to call. This contradicts the claim that Portsman remained in his room for the entire relevant period.
After the testimony changes, present Mr. Portsman’s Office against the statement claiming that Maggey opened Portsman’s office. The actual office-door evidence does not contain Maggey’s fingerprints, so the statement only makes sense if Maggey was misled about which door she opened. If a presentation is rejected, reread the statement currently highlighted rather than presenting the other evidence at random. In particular, do not reverse this sequence: Note Left by Victim comes before Mr. Portsman’s Office in this rebuttal.
- Press to the third statement in Conjecture’s Rebuttal.
- Present Note Left by Victim first.
- Present Mr. Portsman’s Office after the testimony updates.
- Reload the pre-rebuttal save if repeated mistakes reduce the Truth Gauge too far.
5. Resolve Portsman’s alibi through Logic Mode
During Portsman’s Alibi, press every statement. The testimony establishes that Portsman was in Criminal Affairs around 2 AM, but the game expects you to process the complete account rather than immediately contradicting it with evidence. Pressing all statements creates the Logic fact Mr. Portsman’s Alibi.
Combine Another Handgun with Mr. Portsman’s Alibi. This creates Another Visitor. Then combine Another Visitor with Files in Disarray. The deductions show that more than one intruder visited the office and that the office was disturbed during separate visits. Portsman’s Criminal Affairs presence accounts for only the later visitor; it does not clear him from the earlier theft and murder. If the Logic screen does not advance, confirm that every statement in Portsman’s Alibi was pressed and that the two required Logic facts were already obtained.
- Press every statement in Portsman’s Alibi.
- Create Mr. Portsman’s Alibi.
- Combine Another Handgun with Mr. Portsman’s Alibi.
- Combine Another Visitor with Files in Disarray.
- Do not waste presentations against the unchanged alibi testimony.
6. Recover the videotape and complete the episode
In Portsman’s Alibi, Pt. 2, press the fourth statement. The game adds a new statement claiming that Buddy Faith brought only two pieces of evidence: a gun and a pendant. Present Note Left by Victim against this added statement. Faith’s note refers to three pieces of evidence, so the two-item claim is incomplete.
Gumshoe searches Portsman and recovers the videotape. Open the evidence examination view and rotate the tape to its underside or reverse side. Inspect the bloodstain there. Obtaining the videotape alone is not enough; the bloodstain examination is the required inspection that connects it to Faith’s murder.
After Portsman is exposed and arrested, the closing discussion turns to the unidentified second thief and the stolen file. Present Stolen 0-Series File during this final evidence presentation. Allow the complete Yatagarasu-related closing scene to play before saving in a new slot. The next canonical story segment is Turnabout Airlines; do not require a particular replay-menu layout as proof of completion.
- Press the fourth statement in Portsman’s Alibi, Pt. 2.
- Present Note Left by Victim against the added two-item statement.
- Inspect the recovered videotape’s bloodstain on its underside.
- Present Stolen 0-Series File during the final closing discussion.
- Watch the closing Yatagarasu-related scene.
- Save after the transition toward Turnabout Airlines.
Before you move on
- Portsman has been arrested for Buddy Faith’s murder.
- The hallway deception has been resolved using Master Key, Maggey Byrde’s profile, and Basketball Hoop.
- Note Left by Victim has been used in both its required rebuttal contexts.
- The alibi Logic deductions have created Another Visitor and connected it with Files in Disarray.
- The videotape has been recovered and its underside bloodstain has been examined.
- Stolen 0-Series File has been presented during the closing discussion.
- The Yatagarasu-related closing sequence has finished.
- Turnabout Airlines follows as the next canonical story segment or becomes available as the next episode.
- A separate post-completion save has been created.
References for this chapter
- Ace Attorney Investigations: Miles Edgeworth – Spoiler-Free Walkthrough by Shotgunnova, Nintendo DS
- All Cases Guide — Ace Attorney Investigations: Miles Edgeworth, Speedrun.com
- Turnabout Visitor — Transcript
- Turnabout Visitor pt2 — Ace Attorney Investigations: Miles Edgeworth Walkthrough
- Turnabout Visitor — Ace Attorney Wiki
Episode II — Turnabout Airlines: investigation and smuggling-ring lead
The Inherited Turnabout is not part of the North American Nintendo DS game. It is a case from Ace Attorney Investigations 2: Miles Edgeworth, the separate sequel. In the original USA release, Episode II is Turnabout Airlines. This case begins on an airplane, clears Edgeworth of a murder accusation, and establishes the connection between victim Akbey Hicks, Interpol and the smuggling ring. The case uses the original DS controls, Logic deductions, evidence presentations and crime-scene examination. There is no past-and-present flashback structure in this episode.
Confirm the correct episode before playing
After completing Turnabout Visitor, select Episode II: Turnabout Airlines. Do not select The Kidnapped Turnabout: that is Episode III of the first game. Do not use a guide for The Inherited Turnabout, which belongs to Ace Attorney Investigations 2 and uses different case facts, evidence and witnesses.
The episode starts with Edgeworth waking after turbulence in the First Class Lounge. He finds an unfamiliar travel wallet, returns toward his seat and discovers Akbey Hicks's body in the elevator. Rhoda Teneiro accuses him of murder. Save before the first testimony so you can retry presentations without risking unnecessary Truth Gauge loss.
- The episode title reads Turnabout Airlines.
- The evidence organizer contains the travel wallet and crime-scene information, not sequel evidence.
- You are using the DS D-pad or touchscreen movement and the original Logic interface.
Clear the initial accusation in the First Class Lounge
During Rhoda Teneiro's first testimony, present the Travel Wallet against the statement that Edgeworth held the murder weapon. Open the wallet using the DS examination prompt and inspect its contents. When Teneiro argues that Edgeworth killed Hicks for money, present the Crime Scene Notes and select the money scattered on the floor. This disproves theft as the motive and ends the immediate accusation.
Once Edgeworth is released, move left and down to the First Class Lounge. Examine the grape-juice stain near the elevator and select the footprints in the close-up. Then examine the body and inspect the relevant crime-scene details. These observations establish that someone moved through the elevator area after the spill and that the body was not simply attacked where it was found.
Continue to the In-Flight Shop. Examine the broken glass, the display case and the suitcases. Use Logic to connect the captain's hat with the murder weapon when prompted. Examine the empty display shelf and present the Piggy Bank when the game asks what was removed. Connect the suitcases with the turbulence, inspect the wheels of the left suitcase, open it and present the Crime Scene Notes when asked to identify what it carried.
- Present the Travel Wallet to the murder-weapon statement.
- Open the Travel Wallet.
- Present Crime Scene Notes to the money statement and select the money on the floor.
- Examine the elevator spill, footprints, body, broken glass, display case and suitcases.
- Use Logic for the captain's hat and murder weapon, then the suitcases and turbulence.
Resolve Franziska's first logic argument
After the investigation shifts, talk to Gumshoe about both available topics. Go to the In-Flight Lounge and present the Bloody Cloth to Zinc Lablanc. Talk to Lablanc about Rhoda Teneiro, then begin Franziska's Logic testimony.
When Franziska claims the First Class Lounge is the crime scene, present the suitcase. The grape-juice footprints and suitcase-wheel tracks show that the suitcase and body moved through the lounge after the turbulence. Present the grape-juice footprints when requested, followed by the tracks left by the suitcase wheels.
In the next testimony, Franziska argues that Edgeworth prepared the Piggy Bank in advance and used it as the weapon. Present the Piggy Bank against the statement that it was prepared beforehand. The broken glass proves the display case was disturbed after the turbulence, so the Piggy Bank cannot be the original weapon. The game then directs you to the attendant's room.
- Present the suitcase against the claim that the First Class Lounge was the crime scene.
- Present the grape-juice footprints.
- Present the suitcase-wheel tracks.
- Present the Piggy Bank against the premeditation statement.
Investigate Rhoda Teneiro and the missing suitcase
In the attendant's room, talk to Teneiro about the captain's permission and then about the In-Flight Shop. When she denies a connection to the shop, present the Suitcase. Ask about the last suitcase. When she claims her suitcase was bought earlier, examine or highlight its price tag and use that detail to expose the lie.
The game then asks you to identify the relevant location and person. Select the In-Flight Shop, followed by Rhoda Teneiro. This establishes that one suitcase in the room was purchased from the shop, while the bloody-cloth suitcase is an additional suitcase that could not have remained there throughout the flight.
Teneiro's missing keycard sends Edgeworth to the Cargo Hold. Do not treat the arrest as the case conclusion. The cargo hold contains the physical evidence needed to distinguish the real murder scene from the location where the body was found.
- Discuss captain's permission and the In-Flight Shop with Teneiro.
- Present the Suitcase when she denies the connection.
- Discuss the last suitcase and expose the price tag.
- Select the In-Flight Shop, then Rhoda Teneiro.
- Continue to the Cargo Hold.
Use the Cargo Hold evidence to expose the false conclusion
In the Cargo Hold, examine the double row of suitcases and the open black suitcase. The missing suitcase accounts for the additional container seen earlier. Inspect the black suitcase to obtain the victim-related information, then talk to Franziska about the airport.
Use Logic to connect the broken glasses with the glass shards. This identifies the Cargo Hold as the actual murder scene. Connect Franziska's profile with her Interpol assignment, then talk to her about Mr. Hicks. The victim was working undercover on the smuggling-ring investigation and was supposed to meet Franziska after landing.
During Franziska's definitive-evidence testimony, press the statement about the keycard that permits access to the elevator or Cargo Hold. Press the added statement concerning access to the display case, then present the Piggy Bank. When the game asks what still requires investigation, select the body. Gumshoe obtains the autopsy report, confirming that the Piggy Bank was not the murder weapon.
The case continues beyond this investigation segment. Keep the deductions about the Cargo Hold, the missing suitcase, Hicks's Interpol work and the actual murder weapon available in the organizer. They are the bridge between the airplane murder and the wider smuggling-ring storyline.
- Examine the missing-suitcase area and the open black suitcase.
- Talk to Franziska about the airport.
- Connect broken glasses with glass shards.
- Connect Franziska's profile with Interpol.
- Talk to Franziska about Mr. Hicks.
- Press the keycard statements, present the Piggy Bank and select the body when prompted.
Before you move on
- The game identifies the active case as Turnabout Airlines.
- The initial accusation is cleared with the Travel Wallet, Crime Scene Notes and money selection.
- The suitcase, grape-juice footprints and suitcase-wheel tracks have been used against Franziska's first argument.
- Teneiro's suitcase connection and the price-tag contradiction have been resolved.
- The Cargo Hold has been examined and identified as the true murder scene.
- The Logic connections involving broken glasses, glass shards, Franziska's profile and Interpol are complete.
- The autopsy-report sequence has established that the Piggy Bank was not the murder weapon.
- The episode continues into its later investigation and rebuttal sections without importing The Inherited Turnabout or The Kidnapped Turnabout instructions.
References for this chapter
- Capcom News: TGS 2009 Ace Attorney Investigations: Miles Edgeworth; Nintendo DS platform and February 16, 2010 North American release
- Ace Attorney Investigations: Miles Edgeworth – Guide and Walkthrough by The_Lost_Gamer, Nintendo DS
- Ace Attorney Investigations: Miles Edgeworth – Spoiler-Free Walkthrough by MKaykitkats, Nintendo DS
- Ace Attorney Investigations: Miles Edgeworth, Wikipedia
- Ace Attorney Investigations 2: Prosecutor’s Gambit — separate sequel containing The Inherited Turnabout
Episode II — Turnabout Airlines: rebuttal and tying up legacy clues
The second episode of the original North American Nintendo DS release is Turnabout Airlines. This chapter covers the closing investigation and rebuttals after the plane lands: overturning the first-class lounge theory, finding the true crime scene in the cargo hold, exposing the forged Alif Red statue and identifying Cammy Meele as the killer. The ending also connects Akbey Hicks's murder to the smuggling ring through the fake artwork, Borginian cloth and Hicks's Interpol investigation.
Save before the post-landing investigation
Keep a save before beginning the post-landing sequence. The remaining section combines investigation, Logic Mode and several rebuttals. A wrong presentation reduces the Truth Gauge, so reload the backup instead of testing unrelated evidence. During rebuttals, press the testimony first when instructed; pressing can add a statement or reveal the line that must be contradicted.
After the plane lands, speak with Detective Gumshoe and complete the available conversation topics. Return to the plane and speak with Zinc Lablanc. When the discussion concerns the material found at the crime scene, present the Bloody Cloth. Ask about Rhoda Teneiro when that topic becomes available. This leads into Franziska von Karma's argument about the supposed crime scene.
- Save before starting the post-landing section.
- Complete Gumshoe's available conversation topics.
- Speak with Zinc Lablanc aboard the plane.
- Present Bloody Cloth when the material is discussed.
Break the first-class lounge theory
Franziska's initial argument treats the first-class lounge as the murder scene because Edgeworth was the only person there during the relevant period. Press the testimony until the statement identifying the lounge as the murder location appears, then present the Ifly Suitcase. The suitcase indicates that the body was transported instead of being killed in the lounge.
When further proof is requested, present Grape Juice Footprints. In the close-up view, highlight the wheel tracks made through the spilled grape juice. These tracks show that the suitcase moved through the lounge after the turbulence, supporting the conclusion that the body was carried there later.
When Franziska argues that Edgeworth could have prepared the weapon in advance, present the Mr. Ifly Piggy Bank against the statement about the weapon's preparation. This moves the investigation toward the flight attendant's room. Do not present the piggy bank against an earlier, general statement; wait for the line concerning the supposed preparation of the weapon.
- Present Ifly Suitcase against the lounge-as-crime-scene claim.
- Present Grape Juice Footprints when additional proof is requested.
- Highlight the grape-juice wheel tracks.
- Present Mr. Ifly Piggy Bank against the weapon-preparation statement.
Question Rhoda and locate the actual crime scene
In the flight attendant's room, speak with Rhoda Teneiro about the captain's permission, the in-flight shop and the last suitcase. When Rhoda denies a connection to the shop, present Ifly Suitcase. Examine the suitcase's price tag and select the in-flight shop as its source. When asked who is connected to that purchase, select Rhoda Teneiro's profile.
Continue into the lower-deck cargo hold. Examine the row of suitcases and then the open black suitcase associated with Hicks. Speak with Franziska about why she was already at the airport. Use Logic Mode to connect Broken Glasses with Glass Shards. This establishes that Hicks was attacked in the cargo hold rather than in the lounge. Connect Franziska's Profile with Interpol, then ask Franziska about the truth concerning Hicks. This identifies Hicks as an undercover Interpol agent investigating the smuggling ring.
- Question Rhoda about permission, the in-flight shop and the last suitcase.
- Present Ifly Suitcase when Rhoda denies the shop connection.
- Examine the price tag and identify the in-flight shop.
- Inspect the cargo-hold suitcases and Hicks's open black suitcase.
- Connect Broken Glasses with Glass Shards.
- Connect Franziska's Profile with Interpol.
- Ask Franziska about the truth concerning Hicks.
Clear Franziska's Definitive Evidence rebuttal
In the next testimony, press the statement about Rhoda's keycard and elevator access. Press the added statement concerning the display-case key, then present Mr. Ifly Piggy Bank. When the game asks what still needs investigation, choose The Body.
Use Logic Mode to connect Mr. Ifly Piggy Bank with Cause of Death. This shows that the piggy bank cannot explain Hicks's fatal injuries. Next connect Weapon Couldn't Be Found with A Sizable Weapon. When asked to show evidence, choose the option stating that you do not have evidence to show, then choose Free Fall. Present Refueling in Zheng Fa when asked when the murder could have occurred.
Return to the cargo hold, examine the large cargo and speak with Lablanc about his cargo. Connect Smuggling with Valuable Piece of Art. Examine the Alif Red statue and deduce at its eyes, then present Photo of Mr. Hicks. Deduce again at the cloth beneath the statue and present Cargo from Zheng Fa. When the statue is moved, present Borginian Cloth to explain the cleaned bloodstain beneath it. Choose Cammy Meele's testimony when asked who should be confronted.
- Press the keycard-and-elevator statement.
- Press the added display-case-key statement.
- Present Mr. Ifly Piggy Bank.
- Choose The Body.
- Connect the piggy bank with Cause of Death.
- Connect Weapon Couldn't Be Found with A Sizable Weapon.
- Choose that you do not have evidence to show, then choose Free Fall.
- Present Refueling in Zheng Fa.
- Connect Smuggling with Valuable Piece of Art.
- Deduce at the statue's eyes and present Photo of Mr. Hicks.
- Deduce beneath the statue and present Cargo from Zheng Fa.
- Present Borginian Cloth and choose Cammy Meele's testimony.
Expose Cammy Meele and finish Turnabout Airlines
Save when the game provides an opportunity before Cammy's rebuttals. In Ms. Meele's Alibi, press the statement claiming that Cammy was alone in the flight attendant's room from 5 to 6, raise an objection and present Suitcase Receipt. Rhoda's 5:40 purchase proves that someone else was in the room during that period.
In the next testimony, press the statement concerning the keycard and the in-flight shop. Present Alif Red Certificate against the added statement about Cammy's handling of Borginian documents. When Cammy attempts to redirect suspicion toward Rhoda, present Ifly Suitcase and choose Where the Murder Took Place.
Select Missing Cell Phone as the remaining lead. Return to the flight attendant's room and examine Rhoda's closed locker. Examine the camera lens on the phone, then inspect the photograph. Examine the Borginian-labelled boxes in the photograph and present Borginian Cloth. Highlight the box of bedsheets. This shows that the killer selected the Borginian-labelled cloth before the English-labelled bedsheets, demonstrating knowledge of Borginian and tying Cammy to the smuggling operation.
Let the arrest, Rhoda's release and the closing conversations finish. Franziska's information about the smuggling ring and the call leading into the next case are part of the episode's conclusion. Make a new save after the transition while keeping the earlier backup.
- Press Cammy's 5-to-6 statement and raise an objection.
- Present Suitcase Receipt.
- Press the keycard-and-shop statement.
- Present Alif Red Certificate.
- Present Ifly Suitcase and choose Where the Murder Took Place.
- Select Missing Cell Phone.
- Examine Rhoda's closed locker.
- Examine the phone camera and its photograph.
- Present Borginian Cloth.
- Highlight the box of bedsheets.
- Allow the arrest, release and closing dialogue to finish.
- Keep a completed-case save and retain the pre-rebuttal backup.
Before you move on
- Turnabout Airlines has been completed on the original North American Nintendo DS release.
- The first-class lounge theory has been overturned with Ifly Suitcase and Grape Juice Footprints.
- The cargo hold has been established as the actual crime scene.
- The Definitive Evidence sequence has been cleared using the cause-of-death, missing-weapon and Free Fall deductions.
- The Alif Red statue has been exposed as a fake through Photo of Mr. Hicks, Cargo from Zheng Fa and Borginian Cloth.
- Cammy Meele has been identified through the suitcase receipt, Borginian-document evidence, missing cellphone investigation and bedsheets photograph.
- Cammy is arrested and Rhoda Teneiro is released.
- The closing dialogue and transition toward The Kidnapped Turnabout have finished.
- A new save has been made after completion, with the earlier pre-rebuttal backup retained.
References for this chapter
- Ace Attorney Investigations: Miles Edgeworth — Turnabout Airlines overview and case structure, StrategyWiki
- Ace Attorney Investigations: Miles Edgeworth — Turnabout Airlines, Part 2-1, StrategyWiki
- Ace Attorney Investigations: Miles Edgeworth — Turnabout Airlines, Part 2-2, StrategyWiki
- Ace Attorney Investigations: Miles Edgeworth — Turnabout Airlines, Part 2-3, StrategyWiki
- Ace Attorney Investigations: Miles Edgeworth — Turnabout Airlines, Part 2-4, StrategyWiki
- All Cases Guide — Ace Attorney Investigations: Miles Edgeworth, Speedrun.com
- Ace Attorney Investigations: Miles Edgeworth – Guide and Walkthrough by The_Lost_Gamer, Nintendo DS
Episode III — The Kidnapped Turnabout: opening investigation and Stadium reconstruction
The Kidnapped Turnabout begins with Edgeworth held in the Wild, Wild West Area of Gatewater Land. Escape with Kay by examining the room and connecting the correct Logic facts, then investigate the park’s second Blue Badger and the body found in the garage. The opening investigation establishes that the garage is not the murder scene and leads into the first rebuttals against Agent Lang and Officer Meekins. After that, move to the Stadium, question Ema Skye and Wendy Oldbag, and use Little Thief to reconstruct the staged crime scene. This chapter ends after the Stadium reconstruction has corrected the stage position; the later hideout and Haunted House material belongs in Chapter 8.
Escape the Wild, Wild West holding room
The episode opens with Edgeworth tied up in a room in the Wild, Wild West Area. Talk to Kay about both available topics, Great Thief and Yatagarasu. Then examine the room from right to left. Inspect Edgeworth’s cellphone, the Bad Badger head, the Badger Photo Rally sign, the boxes, the tiny key near the boxes, the lockers at the far left, and the beam where Edgeworth was restrained.
The boxes provide the Blue Badger Bible and information about the costumes. The beam and lockers provide Logic facts. After the initial examinations, talk to Kay about the kidnapping. She moves aside so Edgeworth can inspect the adjoining room. Examine the door and the open floor panel there.
Open Logic and connect The beam I was tied to with Open floor panel. This reveals another trap door. Examine it, then connect Tiny key with Underground entrance. Edgeworth uses the key and reaches a small underground room containing a movable ladder. Connect Underground ladder with Lockers. Edgeworth and Kay use the ladder to climb over the lockers and escape through the window.
If the escape does not advance, recheck the beam, open floor panel, tiny key, underground entrance, underground ladder, and lockers. The required actions are Logic deductions, not ordinary evidence presentations.
- Talk to Kay about Great Thief and Yatagarasu.
- Examine the cellphone, Bad Badger head, Badger Photo Rally sign, boxes, tiny key, lockers, and binding beam.
- Talk to Kay about the kidnapping and inspect the adjoining room.
- Connect The beam I was tied to with Open floor panel.
- Connect Tiny key with Underground entrance.
- Connect Underground ladder with Lockers and escape through the window.
Investigate the Wild, Wild West and identify the second Blue Badger
After escaping, talk to Detective Gumshoe and Kay about every available topic. Ernest Amano then arrives. Talk to him about the kidnapping, his son Lance, and Oliver Deacon, the missing family butler. The investigation shifts to the park area near the Blue Badger costume.
Speak with the Blue Badger to discover that the performer is Officer Mike Meekins. Talk to Meekins about everything. He says he has been patrolling the park and mentions seeing a second Blue Badger. Present the Badger Photo Rally when prompted. The rally establishes that only one of each Badger is present in the park, creating the Logic fact A 2nd Blue Badger.
Move to the left side and examine the footprints in the damp ground. Connect Costumes with A 2nd Blue Badger. This creates Costumed escape. Then connect Costumed escape with What kind of shoes? The footprints are identified as Badger-style feet. Examine the footprints again so Kay can follow them to the garage.
Examine the garage door. Meekins opens it, revealing the Blue Badgermobile and Oliver Deacon’s body. Examine the wound. The evidence shows two wounds caused by one bullet, while the garage contains no blood despite the shooting. Examine the necklace around the victim’s neck. Its engraving does not match Deacon’s identity.
Use Deduce on the necklace, then present Preliminary Findings. This updates the investigation by showing that the garage is not a convincing murder scene and that the necklace belongs to someone else. The episode now moves into Lang’s attempt to arrest Meekins.
- Talk to Gumshoe, Kay, and Ernest Amano.
- Talk to Meekins in the Blue Badger costume.
- Present Badger Photo Rally when Meekins mentions a second Blue Badger.
- Examine and revisit the footprints.
- Connect Costumes with A 2nd Blue Badger.
- Connect Costumed escape with What kind of shoes?
- Examine the garage, the wound, and the necklace.
- Deduce the necklace and present Preliminary Findings.
Resolve the garage accusation and the first Blue Badgermobile contradiction
Lauren Paups appears after the garage investigation, followed by Agent Lang and Shih-Na. Lang arrests Meekins and gives his explanation for the arrest. Press the statement about Meekins being a member of law enforcement. Lang then demands Meekins’s gun, and Meekins admits that he lost it.
Lang adds a new claim that Meekins ambushed the victim in the garage and killed him there. Present Preliminary Findings against that statement. The lack of blood and other garage evidence already established that the garage was not the murder scene, so this is the correct contradiction.
Meekins then gives his own account. He says he became distracted while entertaining visitors and eventually reached the Wild, Wild West using the Blue Badgermobile. Present Blue Badgermobile against his statement that he was looking for kidnappers while using it. The vehicle is already inside the garage, contradicting his claim that he had been using it until recently.
This first Blue Badgermobile presentation does not complete the case. Lang suspects Meekins used the vehicle to transport the body, arrests him, and orders Edgeworth and Kay away from the area. Treat this as the transition to the Stadium investigation, not as proof that Meekins is the killer.
- Press Lang’s statement about Meekins being law enforcement.
- Present Preliminary Findings against the claim that Meekins killed the victim in the garage.
- Present Blue Badgermobile against Meekins’s statement about using it while searching for kidnappers.
- Continue to the Stadium after Lang arrests Meekins.
Begin the Stadium investigation and activate Little Thief
At the Stadium, talk to Ema Skye about every available topic. Examine the Pink Badgermobile to make the witness appear, then talk to the Pink Badger. The performer is Wendy Oldbag. Speak with Oldbag until her testimony begins.
Oldbag’s first testimony cannot be solved by presenting evidence because the Stadium reconstruction has not yet been completed. Press the statements about the two men and the gunshot. After the pressing sequence, Kay activates Little Thief and recreates the Stadium crime scene.
In the reconstruction, examine the blue body. The absence of blood is inconsistent with the murder information. Present the murder notes to Kay. This adds the question of missing blood to Logic. Connect Why is there no blood? with Victim was kidnapper? The deduction is that the victim was wearing a Blue Badger costume, which explains why the blood was not visible at the staged scene.
Talk to Ema about footprint analysis. Her examination confirms Blue Badger footprints at the Stadium. This completes the first Little Thief investigation segment. The important result is not yet the identity of the killer; it is the discovery that the Stadium scene involved a costumed victim and was arranged to mislead the investigation.
- Talk to Ema about every available topic.
- Examine the Pink Badgermobile and talk to Wendy Oldbag.
- Press Oldbag’s statements about the two men and the gunshot.
- Examine the blue body in the Little Thief reconstruction.
- Present the murder notes.
- Connect Why is there no blood? with Victim was kidnapper?
- Talk to Ema about footprint analysis.
Correct the Stadium stage position and hand off to Chapter 8
After the first reconstruction, present the victim’s costume against Oldbag’s statement describing the people she saw as ordinary men. Oldbag changes her account and says she was watching from the second-tier balcony. Her position explains why the testimony is unreliable, but it also adds a useful Logic fact: the two figures were in the shadow of the stage.
Examine the stage on the left side of the Stadium. The stage is currently packed up, creating a second stage-related Logic fact. Connect In the shadow of the stage with The stage was packed up. Little Thief updates the reconstruction to show the stage as it was during the incident.
Inspect the red figure in the updated hologram. The figure is positioned incorrectly inside the stage area. Examining it causes Little Thief to correct the parameters and place the killer above the stage. This concludes the Stadium investigation portion covered here.
Stop after the corrected stage position appears. The next chapter should handle Lang’s Stadium theory, the reversed killer-and-victim positions, the stolen costumes, the kidnappers’ hideout, and the later Haunted House reconstruction. Do not jump ahead to those sections while using this chapter.
- Present the victim’s costume against Oldbag’s statement about the two men.
- Examine the stage.
- Connect In the shadow of the stage with The stage was packed up.
- Examine the red figure after Little Thief updates the scene.
- Save before continuing into the next chapter’s Stadium rebuttal.
Before you move on
- Edgeworth and Kay escaped the Wild, Wild West holding room through the underground route and window.
- The second Blue Badger was established with Badger Photo Rally and the costume-related Logic deductions.
- Oliver Deacon’s body was found in the garage, and Preliminary Findings was updated through the wound and mismatched necklace.
- Lang’s garage accusation was contradicted with Preliminary Findings.
- Meekins’s first Blue Badgermobile statement was contradicted by presenting Blue Badgermobile.
- At the Stadium, Ema and Oldbag were questioned, Oldbag’s opening statements were pressed, and Little Thief was activated.
- The reconstruction established the missing blood, the victim’s Blue Badger costume, and the Blue Badger footprints.
- The stage was reconstructed and the red figure was corrected to stand above it.
- The game is ready to continue with the Stadium rebuttal and later hideout material in Chapter 8.
References for this chapter
- Ace Attorney Investigations: Miles Edgeworth – Guide and Walkthrough by The_Lost_Gamer, Nintendo DS
- The Kidnapped Turnabout Part 1 — Ace Attorney Investigations: Miles Edgeworth Walkthrough, Neoseeker
- Ace Attorney Investigations: Miles Edgeworth – Spoiler-Free Walkthrough by Shotgunnova, Nintendo DS
- Ace Attorney Investigations: Miles Edgeworth/The Kidnapped Turnabout — StrategyWiki
Episode III — The Kidnapped Turnabout: rebuttal techniques and failure recovery
This chapter begins at the Stadium, after the earlier garage confrontation and the first Stadium testimony setup have been completed. From here, resolve Agent Lang's two connected theories, investigate the Kidnapper's Hideout, expose the staged kidnapping during the entrance confrontation, and finish with Little Thief's Haunted House reconstruction. The case advances the smuggling-ring thread when Shi-Long Lang continues investigating Ernest Amano's connection to the ring and when Prosecutor Jacques Portsman intervenes after Lance's arrest. Save before the longer rebuttals, and present evidence only against the statement or highlighted detail that it directly contradicts.
1. Correct Lang's Stadium shooting theory
At the Stadium, Lang claims that Mike Meekins stood on the stage and shot Oliver Deacon from above. Present Mr. Deacon's Murder Notes against the statement describing the high-angle shot. When Lang asks what is wrong with the reconstruction, select The killer's and victim's locations.
The Little Thief display updates so that the victim is on the stage and the killer is below it. This matters because the footprints identify the killer's disguise as a Blue Badger costume, just as the victim was disguised. Do not present Blue Badgermobile here; that evidence is reserved for Lang's following tire-mark theory.
- Mr. Deacon's Murder Notes presented against the high-angle shooting statement.
- The killer's and victim's locations selected.
- The reconstruction updated to place the victim above the killer.
2. Reject the Blue Badgermobile tire-mark theory
Lang next argues that Meekins used the Blue Badgermobile to move Deacon's body from the Stadium to the Wild, Wild West Area. Present Blue Badgermobile against the statement claiming that Meekins used the vehicle to transport the body.
The game then asks you to inspect the vehicle image. Select the clean tires. The muddy tire marks at the Stadium cannot have been made by Meekins's clean-tired vehicle. This is the second use of Blue Badgermobile in the case, separate from the earlier Meekins testimony that should already have been resolved before this chapter begins.
A third vehicle, associated with the Proto Badger costume, becomes the likely transport vehicle. Lance Amano then appears and claims to have escaped. Lang removes Edgeworth and Kay from the Stadium, moving the case into its next investigation segment.
- Blue Badgermobile presented against the body-transport statement.
- The clean tires selected in the vehicle image.
- Lance Amano's appearance and the transition away from the Stadium triggered.
3. Choose the Kidnapper's Hideout and collect its evidence
Back in the Wild, Wild West Area, talk to Ernest Amano and Lauren Paups until their available topics are exhausted. Choose Kidnapper's Hideout when Kay asks where to investigate next. Speak with the police officer guarding the entrance. He permits access and provides Colin Devorae Dossier, revealing that Oliver Deacon was an alias used by the murder victim.
Inside the hideout, examine the damaged door and its handle, the broken prop sword near the door, the dumpster of old costume pieces, the three folding chairs, and the three cups. The exact order is flexible, but all of these examinations are needed before the deductions can be completed.
Connect Folding chairs with 3 cups to establish that three people used the hideout. Connect Broken prop sword with The door leading outside to show that the sword jammed the door rather than locking it. When the Proto Badger explains that a Bad Badger costume is unaccounted for, select the Pink Badger costume when asked why this does not prove the existence of a fourth kidnapper.
Connect Unaccounted for Bad Badger with Costume pieces. Examine the recovered costume and inspect the right hand, where the model gun is missing. Deduce at the damaged hand and present Blue Badger Bible. This produces Missing Model Gun and completes the hideout investigation.
- Ernest Amano and Lauren Paups fully questioned.
- Kidnapper's Hideout selected.
- Colin Devorae Dossier obtained from the guarding officer.
- Door, door handle, Broken prop sword, dumpster, chairs, and cups examined.
- Folding chairs connected with 3 cups.
- Broken prop sword connected with The door leading outside.
- Pink Badger costume selected.
- Unaccounted for Bad Badger connected with Costume pieces.
- Right hand examined and Blue Badger Bible presented.
- Missing Model Gun obtained.
4. Resolve the entrance confrontation in sequence
At the park entrance, examine the neck hole of the recovered Blue Badger costume. This produces Ms. Paups's Pendant. Lauren then confesses to the murder. Save before continuing if you have an open slot, because the following confrontation contains several sequential testimony changes.
During Ms. Paups's Confession, press the statement that Mr. Deacon turned on Lauren and tried to kill her, then select Raise an objection. Present Mr. Deacon's Pendant followed by Ms. Paups's Pendant. Present Colin Devorae Dossier and highlight the word Daughter. The matching pendants and dossier establish their family connection.
When Lang proposes that Lauren and Deacon planned the kidnapping together, present Stolen Costumes against the statement referring to the two kidnappers. Then present Lance Amano when the game asks who the third participant was. Lance's supposed kidnapping was staged to obtain the ransom money.
During Lance's testimony, press the statement about making his escape. Present Broken Prop Sword against the statement claiming that the door leading outside was locked and that Lance had to use the underground passageway. The hideout evidence shows that the sword only jammed the door from the outside. When Lang asks for Lance's motive, present Love Letter.
The next testimony concerns the Bad Badger holding a gun. Press the statement about the Badger aiming at Lauren, then present Colin Devorae Dossier against the added claim that the gun was held in the victim's left hand. Select Both are correct when prompted, present Bad Badger's Head, select Proto Badger, and present Missing Model Gun. The costume combination explains why the apparent Bad Badger did not use the normal right-hand model gun.
For the testimony about what Lauren saw, press the statement that Deacon had been tied to the beam in the other room. Press the new statement identifying the captive by the Bad Badger head, choose Raise an objection, and present Bad Badger's Head. Select Miles Edgeworth when asked who the captive actually was. Lance used Edgeworth's unconscious body to make Lauren believe that Deacon was tied up there.
- Ms. Paups's Pendant obtained from the Blue Badger costume.
- Mr. Deacon's Pendant and Ms. Paups's Pendant presented in that order.
- Daughter highlighted in Colin Devorae Dossier.
- Stolen Costumes presented against the two-kidnapper claim.
- Lance Amano presented as the third kidnapper.
- Broken Prop Sword presented against the locked-door statement.
- Love Letter presented for Lance's motive.
- Colin Devorae Dossier, Both are correct, Bad Badger's Head, Proto Badger, and Missing Model Gun used in order.
- Bad Badger's Head presented again in the testimony about the captive.
- Miles Edgeworth selected as the captive.
5. Prove the Stadium was staged and identify the Haunted House
Ernest supplies the Revolver and Victim's Costume. Examine the Revolver, the bullet hole in Victim's Costume, and the neck hole. The bullet hole shows a close-range shot, while the neck hole contains Mirror Fragments.
In the decisive-evidence testimony, press the statement about fingerprints on the gun and choose Raise an objection. Present Stolen Costumes to show that Lauren was wearing a costume when the alleged Stadium shooting occurred. Present Victim's Costume, then select the bullet hole. When asked for the true crime scene, select Haunted House and present Mirror Fragments.
Ernest has purchased the Haunted House and refuses ordinary access, but the investigation continues through Little Thief. Do not stop after identifying the Haunted House; the case is not complete until the reconstruction and Lance's confession are finished.
- Revolver, Victim's Costume bullet hole, and neck hole examined.
- Mirror Fragments obtained.
- Stolen Costumes presented against the fingerprint claim.
- Victim's Costume presented, followed by the bullet hole.
- Haunted House selected as the real crime scene.
- Mirror Fragments presented to support the Haunted House location.
6. Complete the Haunted House Little Thief reconstruction
When the hologram begins, select the green dot representing the Blue Badger figure. Examine the Bad Badger figure and present Broken Prop Sword. Choose Test with Luminol. The blood placement identifies the side of the sword used in the attack. Deduce at the left hand and present Broken Prop Sword again. When the hand position creates a contradiction with the Bad Badger's normal equipment, present Blue Badger Bible. This reveals that the attacker was not the Bad Badger shown by the initial theory.
Examine the Blue Badger figure. Deduce at the belt and present Blue Badger Bible to record that the belt is reversed. Examine the wall mirror near the figure to obtain the mirror-related Logic item. Connect Blue Badger in reverse with Mirror shards. The apparent straight hallway is a reflection created by a movable mirror wall.
Present Gatewater Land Pamphlet to explain the Disappearing Badger attraction, then select Move the mirror-wall. Select the obscured area on the left, behind the mirror wall, and select the same far-left area again when asked to identify the body's position. Finally, present Victim's Costume. This establishes that the Badger seen after Edgeworth returned from the ransom drop was the victim's costume and completes the murder reconstruction.
Lance confesses and is arrested for murder. Ernest Amano is arrested for tampering with evidence. Lang questions Ernest about his smuggling-ring connection before Jacques Portsman takes control of the case and leaves with the Amanos and Buddy Faith. The episode then transitions to Turnabout Reminiscence, Episode IV.
- Green dot for the Blue Badger figure selected.
- Bad Badger examined.
- Broken Prop Sword presented and Test with Luminol selected.
- Left hand deduced and Broken Prop Sword presented again.
- Blue Badger Bible presented when the hand and equipment contradiction appears.
- Blue Badger belt examined and Blue Badger Bible presented.
- Wall mirror examined.
- Blue Badger in reverse connected with Mirror shards.
- Gatewater Land Pamphlet presented.
- Move the mirror-wall selected.
- Hidden far-left area selected twice.
- Victim's Costume presented.
- Lance confesses and the story advances to Turnabout Reminiscence.
Before you move on
- Lang's high-angle Stadium theory has been disproved with Mr. Deacon's Murder Notes.
- The later Blue Badgermobile presentation has been completed by selecting the clean tires.
- The hideout has established three kidnappers and produced Broken Prop Sword and Missing Model Gun.
- The entrance confrontation has linked the pendants, identified Lance as the third kidnapper, exposed the fake locked door, and established Lance's motive with Love Letter.
- The Bad Badger disguise and Missing Model Gun sequence has been resolved.
- Revolver, Victim's Costume, and Mirror Fragments have been examined or obtained as required.
- The Haunted House has been selected as the real crime scene.
- The Little Thief reconstruction has identified the sword attack, the reversed Blue Badger, the movable mirror wall, and the hidden far-left body location.
- Victim's Costume has been presented at the end of the reconstruction.
- Lance Amano confesses and is arrested, Ernest Amano is arrested for evidence tampering, and the story proceeds into Episode IV: Turnabout Reminiscence.
References for this chapter
- Ace Attorney Investigations: Miles Edgeworth – Guide and Walkthrough by The_Lost_Gamer, Nintendo DS
- Ace Attorney Investigations: Miles Edgeworth — The Kidnapped Turnabout, Part 3-1: Beginning
- The Kidnapped Turnabout — Transcript, Part 2
- Ace Attorney Investigations: Miles Edgeworth — The Kidnapped Turnabout, Part 3-3: Middle 2
Episode IV — Turnabout Reminiscence: complex multi-location logic and required reconstructions
Turnabout Reminiscence is the fourth episode of the original Nintendo DS game and takes place entirely in a flashback. Edgeworth begins with only his Prosecutor’s Badge and investigates the apparent mutual killing of Byrne Faraday and Mack Rell in Defendant Lobby No. 2. The central progression depends on examining every relevant object, combining Logic entries in the correct pairs, and revisiting witnesses after new evidence appears. This chapter covers the District Court opening, the staged crime scene, the KG-8 connection, the hallway investigation involving Gumshoe and the Judge, Kay’s introduction, the Yatagarasu’s Key, and the missing surveillance recording. It ends immediately before Ms. Yew’s final confrontation in District Court (3).
1. Start the flashback at District Court (1)
At District Court (1), speak with Manfred von Karma and use both available conversation topics. The game adds KG-8 Incident Overview to the Court Record. Talk to von Karma about the Yatagarasu before leaving his side of the scene; this conversation is required to establish the earlier thief investigation.
Edgeworth then moves to the hallway. Speak with Detective Badd, Calisto Yew, and Detective Gumshoe. Exhaust every available topic for each person. Gumshoe’s conversation adds Detective Gumshoe’s Testimony and opens Defendant Lobby No. 2 as the crime scene. Do not leave the hallway early or attempt to advance by examining unrelated areas first.
This is a flashback investigation, so the inventory is intentionally small. Little Thief is not used in this portion. Progress comes from conversations, hotspot examinations, Logic combinations, and rebuttals. Save before the first testimony if you want a clean retry point.
- Speak with Manfred von Karma on both topics.
- Obtain KG-8 Incident Overview.
- Discuss the Yatagarasu with von Karma.
- Speak with Badd, Yew, and Gumshoe in the hallway.
- Confirm that Detective Gumshoe’s Testimony has been added.
2. Examine Defendant Lobby No. 2 and expose the staged hand placement
Examine the television, the tea set, and the plastic bags around the table. These examinations create the Neat and Tidy Table and Plastic Bags Strewn About Logic entries. Examine the open window to add Lobby No. 2 Window to Logic.
Inspect the two corpses and then examine the handgun, knife, clenched hand of the upper corpse, and bloody bag. After the bodies are turned over, inspect the gunshot wound, stab wound, and pen in the suit’s front pocket. These examinations provide Crime Scene Notes and the Fountain Pen in Pocket Logic entry.
Combine Fountain Pen in Pocket with Ink Stain. This produces Mr. Faraday’s Fountain Pen. Then combine Neat and Tidy Table with Plastic Bags Strewn About to obtain the Plastic Bag evidence. When Edgeworth asks you to identify the suspicious detail, deduce at the hand holding the gun and present Mr. Faraday’s Fountain Pen.
The pen establishes that Faraday was left-handed, contradicting the apparent placement of the gun. This is the first proof that the bodies and weapons were arranged to make the deaths look like a mutual attack. If the deduction does not appear, recheck the corpses, the pocket, and both Logic pairs rather than trying to leave the room.
- Examine the television, tea set, plastic bags, and open window.
- Inspect the handgun, knife, clenched hand, and bloody bag.
- Inspect both wounds and the pen in the suit pocket.
- Combine Fountain Pen in Pocket with Ink Stain.
- Combine Neat and Tidy Table with Plastic Bags Strewn About.
- Deduce at the hand holding the gun and present Mr. Faraday’s Fountain Pen.
3. Resolve the opening testimonies and establish the KG-8 connection
In What Happened, press the third statement. On the revised statement, present Detective Gumshoe’s Testimony. Choose the second response when asked what seems wrong, then present Crime Scene Notes and choose the second response concerning the contradiction at the crime scene.
In What Happened, Part 2, press the third statement. Present Handgun on the revised statement. When asked who attacked first, select the third response. When asked for evidence that another person was present, present either Handgun or Plastic Bag. Select the first response when asked what question should be investigated next.
During Gumshoe’s Motive, press the fifth statement and raise the objection. Choose the second response after the testimony is clarified. In Motive to Kill the Men, present KG-8 Incident Overview on the first statement. This connects Faraday and Rell to the earlier KG-8 incident.
Speak with Calisto Yew after the testimonies. Discuss the available topic, present KG-8 Incident Overview when prompted, and choose the second response about the connection between the cases. Then discuss the remaining topics. These conversations must be completed before District Court (2) becomes available.
- Press the third statement in What Happened.
- Present Detective Gumshoe’s Testimony and then Crime Scene Notes.
- Present Handgun after the revised statement in What Happened, Part 2.
- Choose the third response about who attacked first.
- Use Handgun or Plastic Bag as evidence of another person.
- Present KG-8 Incident Overview during Motive to Kill the Men and with Yew.
4. Investigate the corridor and disprove the Judge’s timing account
In District Court (2), speak with Yew and exhaust all four topics. Speak with Gumshoe and exhaust all three topics. Obtain Annual Bonus Envelope, speak with Gumshoe again, and present Detective Gumshoe’s Testimony. The game then adds Swiss Roll automatically.
Take the left-hand exit into the lobby corridor. Speak with the Judge and discuss his available topic. Speak with Detective Badd, discuss both topics, and select the first response when asked whether to question him further. This adds Detective Badd’s Testimony.
Examine the brown vending machine to add Vending Machine to Logic. Examine the hallway window, the pink scrap on the windowsill, the planter, the mass of ants beneath the bench, and the handprint on the bench. These examinations produce Pink Piece of Trash, Windowsill Cactus, Swiss Roll Crumbs, and Detective Gumshoe’s Fingerprints.
Combine Pink Piece of Trash with Windowsill Cactus to obtain Balloon Piece. Combine Swiss Roll Crumbs with Vending Machine, then examine the vending machine again. Deduce at the Swiss Roll $6 advertisement and present Annual Bonus Envelope. The six-dollar price conflicts with Gumshoe’s five-dollar bonus.
In What I Saw at Recess, present Detective Gumshoe’s Fingerprints on the fourth statement. In What I Saw, Part 2, press the second statement, present Detective Badd’s Testimony on the new third statement, and then present Balloon Piece. In While I Was on Duty, press the third statement. On the revised statement, present either Swiss Roll or Detective Gumshoe’s Fingerprints, then present Swiss Roll again when prompted.
- Obtain Annual Bonus Envelope and Swiss Roll.
- Question the Judge and Detective Badd in the corridor.
- Examine the vending machine, window, scrap, cactus, ants, and handprint.
- Combine Pink Piece of Trash with Windowsill Cactus.
- Combine Swiss Roll Crumbs with Vending Machine.
- Present Annual Bonus Envelope at the six-dollar deduction.
- Use Gumshoe’s fingerprints, Badd’s testimony, Balloon Piece, and Swiss Roll in the rebuttals.
5. Meet Kay and prepare the missing-surveillance-video deduction
After the corridor testimonies, speak with Kay and present Swiss Roll. Speak with her again, discuss the first topic, and obtain Promise Notebook. Discuss the remaining topics and present Promise Notebook when the game asks for proof. Finish this conversation before proceeding to District Court (3).
In District Court (3), speak with Detective Badd and obtain Ms. Yew’s Perfume. Discuss every available topic. Edgeworth then moves to the courtroom area. Examine the prosecutor’s bench on the left and inspect the handgun, manila envelope, knife, and organizer. This provides Mr. Faraday’s Organizer and Yatagarasu’s Key data.
When the game asks about the knife being smuggled, present Yatagarasu’s Key. During the examination of the knife, inspect the underside of the handle, specifically the colored base area. This reveals the concealed key-and-knife mechanism. Edgeworth returns to Lobby No. 2.
Speak with Badd, present Yatagarasu’s Key, and discuss the available topic. In Detective Badd’s Movements, press the third statement. On the newly added fourth statement, present Balloon Piece. This produces Dissipating the Smell, Very Loud Television, and Missing Evidence Logic entries.
Combine Dissipating the Smell with Lobby No. 2 Window to obtain Open Windows. Combine Open Windows with Very Loud Television to obtain Gunshot Could Be Heard. Finally, combine Gunshot Could Be Heard with Missing Evidence.
Examine the video player beneath the television to obtain Surveillance Video. Deduce at the open window and present Surveillance Video. When asked what factor the killer manipulated, select the option identifying when the crime took place. The conclusion is that the recording’s delayed gunshot created a false timeline and gave the killer time to establish an alibi.
This is the handoff point for the next chapter. Save after presenting Surveillance Video, but do not continue into Ms. Yew’s courtroom confrontation if following this chapter as an ordered guide section. The next section begins with the final District Court (3) testimonies.
- Present Swiss Roll to Kay and obtain Promise Notebook.
- Complete the Promise Notebook conversation.
- Obtain Ms. Yew’s Perfume and Mr. Faraday’s Organizer.
- Obtain and inspect Yatagarasu’s Key.
- Press Badd’s third statement, then present Balloon Piece on the new fourth statement.
- Combine the three Logic pairs involving the windows, television, and missing evidence.
- Examine the video player and obtain Surveillance Video.
- Deduce at the open window and present Surveillance Video.
- Select the option identifying when the crime took place.
- Save immediately before the final confrontation with Calisto Yew.
Before you move on
- District Court (1) and Defendant Lobby No. 2 are complete.
- The staged hand placement has been disproved with Mr. Faraday’s Fountain Pen.
- The opening testimonies have connected the murders to the KG-8 Incident.
- The corridor investigation has produced Balloon Piece, Detective Gumshoe’s Fingerprints, and the Swiss Roll deduction.
- The Judge and Detective Badd testimony sequences are resolved.
- Promise Notebook has been obtained and used with Kay.
- Yatagarasu’s Key has been identified and its concealed knife mechanism inspected.
- Dissipating the Smell, Open Windows, Very Loud Television, Gunshot Could Be Heard, and Missing Evidence have been combined as required.
- Surveillance Video has been obtained from the player beneath the television.
- Surveillance Video has been presented after deducing at the open window.
- The option identifying when the crime took place has been selected.
- A save exists immediately before Ms. Yew’s final confrontation in District Court (3).
References for this chapter
Episode IV — Turnabout Reminiscence: rebuttal, cross-checks and consequence tracking
This chapter starts immediately after the Surveillance Video deduction in the Nintendo DS version of Turnabout Reminiscence. The investigation has already established that the killer manipulated the perceived time of the crime by using the open windows, the television and the missing surveillance recording. Edgeworth now returns to Courtroom No. 3 for the final confrontation with Calisto Yew. Follow the presentation order below to finish the episode and reach the normal transition into Episode V: Turnabout Ablaze.
1. Begin Ms. Yew's Argument
After the Surveillance Video deduction, the game moves Edgeworth to District Court, Courtroom No. 3. The courtroom sequence begins with Ms. Yew's Argument. Read through every statement and press each one. Pressing all of the statements is required because the additional information leads to the contradiction involving the open window and the surveillance recording.
When the testimony has been fully pressed, present Surveillance Video. The game asks how the apparent gunshot could have been heard despite the soundproofed courtroom lobbies. Choose the response identifying the open window as the relevant explanation. The earlier deductions have already established that the windows allowed the television sound and the recorded gunshot to carry between the lobbies.
When Edgeworth is asked to identify the real murderer, present Calisto Yew's profile. This ends the initial argument and begins Yew's final rebuttal. If the profile list is arranged by pages, use the profile entry for Calisto Yew rather than a piece of evidence.
- Start in Courtroom No. 3 immediately after the Surveillance Video deduction.
- Press every statement in Ms. Yew's Argument.
- Present Surveillance Video after pressing the testimony.
- Choose the open-window explanation when asked about the gunshot and soundproofing.
- Present Calisto Yew's profile when asked who the real murderer is.
2. Resolve Ms. Yew's Rebuttal
In Ms. Yew's Rebuttal, present Ms. Yew's Perfume on the first statement. The perfume connects Yew to the open-window sequence: its smell prompted the window to be opened, allowing the recorded gunshot and the television sound to be heard. Do not present Surveillance Video again here; the contradiction in this testimony is the perfume's connection to the window.
The rebuttal then changes to Why It Couldn't Be Me. Press the fourth statement. Pressing it adds a new fifth statement, which is the statement concerning the key found in the evidence bag and the claim that a simple key could not have been used to kill anyone.
Present Yatagarasu's Key on the newly created fifth statement. This is the critical cross-check. The key was not merely an ordinary object in the evidence bag: it could be transformed into the knife used in the murder. The presentation links Yew's knowledge of the key-and-knife mechanism to the murder weapon and exposes the flaw in her denial.
- Present Ms. Yew's Perfume on the first statement of Ms. Yew's Rebuttal.
- Enter Why It Couldn't Be Me.
- Press the fourth statement to reveal the new fifth statement.
- Present Yatagarasu's Key on the revised fifth statement.
- Do not leave the sequence before answering the following identity prompt.
3. Identify the person connected to the knife
After presenting Yatagarasu's Key, the game asks who would have known about the connection between the key and the knife from the beginning. Present the Yatagarasu profile. Use the Yatagarasu profile, not Calisto Yew's profile and not Yatagarasu's Key again. This answer completes the final evidentiary link between the murder method and the identity that Yew has been concealing.
The resulting scene resolves the confrontation and confirms that Calisto Yew was responsible for the murders in the case. Continue through the dialogue and cutscenes instead of resetting or returning to investigation screens. The episode is not completely finished the instant the rebuttal ends; one follow-up presentation remains.
- At the identity prompt after the key presentation, present the Yatagarasu profile.
- Allow the resulting confrontation and dialogue to continue.
- Do not treat the end of the rebuttal as the episode-completion point.
4. Complete the final Swiss Roll follow-up
After the confrontation, the game presents a final follow-up prompt connected to the relationship between Gumshoe and Kay and the earlier Swiss Roll sequence. Present Swiss Roll. This is the last required presentation in Turnabout Reminiscence and is separate from the earlier courtroom deductions involving the vending machine, the crumbs and the price of the snack.
Once Swiss Roll has been presented, let the remaining dialogue and cutscenes play. The game should leave the courthouse sequence and proceed through the normal story transition into Episode V: Turnabout Ablaze. If the transition does not occur, reload the save made before the final confrontation and repeat the sequence rather than trying unrelated evidence.
- Present Swiss Roll at the final follow-up prompt.
- Watch the closing dialogue and cutscenes.
- Confirm that the story transitions to Episode V: Turnabout Ablaze.
5. Make a transition save and verify the handoff
As soon as Episode V begins, create a new backup save in a separate slot. Keep the pre-confrontation save until the transition has been confirmed, then retain the new Episode V save as the continuing campaign file. This gives you a safe recovery point if you later need to replay the final Reminiscence sequence or compare the evidence and profiles carried into the next episode.
The correct handoff is the normal start of Turnabout Ablaze, not merely the appearance of the final Yew dialogue. The required final sequence is: press every statement in Ms. Yew's Argument, present Surveillance Video, select the open-window explanation, identify Calisto Yew, present Ms. Yew's Perfume, press the fourth statement in Why It Couldn't Be Me, present Yatagarasu's Key on the new fifth statement, present the Yatagarasu profile, and finally present Swiss Roll.
- Keep a save from before the final courtroom sequence until the transition is secure.
- Create a separate backup save after Turnabout Ablaze begins.
- Verify that Turnabout Ablaze, rather than another investigation segment from Reminiscence, is now active.
- Retain the completed Reminiscence save for campaign continuity.
Before you move on
- Ms. Yew's Argument has been fully pressed.
- Surveillance Video was presented during the initial courtroom argument.
- The open-window explanation was selected for the gunshot and soundproofing contradiction.
- Calisto Yew's profile was presented as the real murderer.
- Ms. Yew's Perfume was presented on the first statement of Ms. Yew's Rebuttal.
- The fourth statement in Why It Couldn't Be Me was pressed, revealing the revised fifth statement.
- Yatagarasu's Key was presented on the revised fifth statement.
- The Yatagarasu profile was presented at the identity prompt.
- Swiss Roll was presented in the final follow-up.
- The story transitioned normally into Episode V: Turnabout Ablaze.
- A backup save was created after Episode V began.
References for this chapter
- Turnabout Reminiscence Part 4 — Ace Attorney Investigations: Miles Edgeworth Walkthrough
- Ace Attorney Investigations: Miles Edgeworth Spoiler-Free Walkthrough
- Turnabout Reminiscence — Ace Attorney Wiki
- Ace Attorney Investigations: Miles Edgeworth – Guide and Walkthrough by The_Lost_Gamer, Nintendo DS
Episode V — Turnabout Ablaze: opening the final investigation and tracing the smuggling ring
Turnabout Ablaze’s middle route moves from Theatrum Neutralis to the Babahlese Embassy, the Allebahstian Embassy, the Rose Garden, and back to the theater. Follow the investigation order carefully: several pieces of evidence are temporary and are removed or updated when the story changes segments. This chapter ends after the final Theatrum Neutralis investigation produces Security Footage and Pushcart, immediately before Ambassador Alba’s alibi and the concluding rebuttals.
1. Investigate Theatrum Neutralis and open the Babahlese Embassy route
At Theatrum Neutralis, examine the table near the entrance to obtain Embassy Guide. Speak with the Steel Samurai and complete the available conversation to receive Steel Samurai’s Autograph. The story then moves Edgeworth to the Babahlese Embassy, where Gumshoe becomes his partner.
Speak with Franziska and complete her available topics. Her conversation creates Franziska’s Return and Stealing of Secret. Connect those two Logic facts, then speak with Franziska again to receive Cohdopian Paper Document.
In the Babahlese Embassy office, examine the ornamental knife display, the locked safe, the statue on its pedestal, and the butterfly painting. Examine Coachen’s body and the bloody knife. These examinations create or update the relevant knife, statue, butterfly, safe, and body clues. Examine the object in Coachen’s pocket, then inspect the yellow base of the key in the three-dimensional evidence view to identify Yatagarasu’s Key.
Connect Butterfly of Babahl with Motif on Knife Handle. Speak with Ambassador Palaeno and complete the newly available topics to create Key Used at Embassy. Connect Key Used at Embassy with Locked Safe. Examine the exposed safe papers and select the option that identifies the safe as containing a secret. Inspect the star-shaped hole on the left side of the safe and present Yatagarasu’s Key. Examine the key’s blade when prompted, then present Cohdopian Paper Document to complete the safe deduction.
Do not leave the room after merely examining the key. The yellow base, the star-shaped safe opening, the key examination, and the paper comparison are separate required actions.
Save before the confrontation. In Why Arrest Kay?, press the third statement. When the revised fourth statement appears, present Yatagarasu’s Key. In Definitive Evidence, present Babahlese Knife on the second statement. Examine the base of the blade and then the emblem on the bloodless portion to update the evidence to Babahlese Knife Handle. Present Embassy Guide when requested. This completes the opening Babahlese Embassy confrontation and moves the investigation to Allebahstian Embassy.
- Obtain Embassy Guide and Steel Samurai’s Autograph.
- Create and connect Franziska’s Return and Stealing of Secret.
- Obtain Cohdopian Paper Document and Yatagarasu’s Key.
- Open the safe using Key Used at Embassy and Yatagarasu’s Key.
- Present Babahlese Knife, inspect it to obtain Babahlese Knife Handle, and present Embassy Guide.
- Clear Why Arrest Kay? and Definitive Evidence.
2. Complete the first Allebahstian Embassy investigation
At the beginning of this segment, speak with Franziska to obtain Counterfeit Bills. Speak with Palaeno to obtain Babahlese Ink. After the party moves to the other embassy, Franziska becomes Edgeworth’s partner.
Speak with Detective Badd and complete both topics. Speak with Larry and complete his second topic to create Smoke from Chimney. Examine the ornamental knife display and the display itself. Deduce the bent spear and present Steel Samurai’s Autograph to obtain Samurai Spear.
Examine the corpse, its head, the bloody katana, and the corpse’s right hand. Obtain Samurai Sword and Demasque II’s Note. Examine the table beside the fireplace to obtain Photo with Steel Samurai. Examine the planter on the windowsill to obtain Passionflowers. Examine the statue on the pedestal, deduce its identity, and present Photo with Steel Samurai to identify Allebahst’s Primidux Statue.
When Oldbag appears as the Pink Princess, complete her first topic to obtain Stand-In Request and Letter from a Stalker. Discuss her next topic to create Used the Fireplace. Missile finds Lady’s Undershirt; present it to Oldbag and complete the next conversation to obtain Samurai Dogs.
Connect Smoke from Chimney with Used the Fireplace to create Shared Chimney. Connect Shared Chimney with Undershirt from Next Door to create Connected Fireplaces. The investigation then gives way to several rebuttals.
For Up on the Rooftop, press statement 5, raise the objection, present Oldbag’s profile, and then present Stand-In Request. In Larry’s Assertion, present Letter from a Stalker on statement 5, identify the letter’s title as Wendy, and present Steel Samurai’s Autograph. In Why Larry?, press statement 2 and present Samurai Spear on the revised third statement. In Why Larry? Part 2, press statement 3, raise the objection, present Allebahst’s Primidux Statue, and inspect the handprint on its underside.
The required outcome is not just the evidence collection. All four rebuttal blocks must be cleared before the next investigation route opens.
- Obtain Counterfeit Bills and Babahlese Ink.
- Obtain Samurai Spear, Samurai Sword, Demasque II’s Note, Photo with Steel Samurai, Passionflowers, and Allebahst’s Primidux Statue.
- Obtain Stand-In Request, Letter from a Stalker, Lady’s Undershirt, and Samurai Dogs.
- Create Shared Chimney and Connected Fireplaces.
- Clear Up on the Rooftop, Larry’s Assertion, Why Larry?, and Why Larry? Part 2.
3. Search the Rose Garden and return to the Babahlese Embassy
At the start of the Rose Garden and Babahlese Embassy segment, Stand-In Request, Letter from a Stalker, Lady’s Undershirt, and Steel Samurai’s Autograph are removed from the organizer. Kay is initially Edgeworth’s partner. Speak with Gumshoe to obtain Silhouette Lantern. Speak with Palaeno and present Allebahst’s Primidux Statue to obtain Pick. Kay then gives Edgeworth Ms. Yew’s Perfume.
Enter the Allebahstian Embassy and investigate the Rose Garden. Examine the king’s statue, queen’s statue, and pool to obtain Fountain Spouts. Speak with Lang. When asked about the shadow, present one statue and then the other when the question is repeated. Separately inspect the queen’s statue’s open hand. Detective Badd then provides Photo of Yatagarasu.
Return through Theatrum Neutralis to the Babahlese Embassy. Examine the Secretariat’s desk and open drawer. Deduce the hat-shaped notepad and present Demasque II’s Note. Examine the ink bottle before exhausting Palaeno’s new conversation topics. Speak with Palaeno to obtain Fires in Babahl, Renovations, and Amb. Palaeno’s Testimony.
When Gumshoe appears, inspect the fire hologram. Present Silhouette Lantern, Babahlese Ink, and Counterfeit Bills as requested, updating the counterfeit-bill description. Examine the grandfather clock to obtain Wire. Speak with Gumshoe again to receive Shih-na’s Location. Obtain Bilateral Symmetry from the conversation.
Connect Bilateral Symmetry with Connected Fireplaces to create Revolving Fireplace Used?. Deduce the fireplace logs and present Amb. Palaeno’s Testimony to create Missing Ashes. Connect Missing Ashes with Revolving Fireplace Used? to obtain Revolving Fireplace Wall and create Escaped Through Revolving Fireplace. Finally connect Escaped Through Revolving Fireplace with Shih-na’s Location. The case moves to Theatrum Neutralis for Shih-na’s confrontation.
The evidence removals are intentional. Do not expect the original Oldbag-related items or every piece of Babahlese fire evidence to remain permanently in the organizer.
- Record the temporary evidence removed at the segment start.
- Obtain Silhouette Lantern, Pick, Ms. Yew’s Perfume, Fountain Spouts, and Photo of Yatagarasu.
- Deduce the hat-shaped notepad and update Demasque II’s Note.
- Obtain Fires in Babahl, Renovations, Amb. Palaeno’s Testimony, Wire, and Shih-na’s Location.
- Create Revolving Fireplace Wall and Escaped Through Revolving Fireplace.
4. Resolve the Shih-na confrontation at Theatrum Neutralis
Before the main rebuttal, present Shih-na’s profile. When asked for evidence connected with the fire, present Photo of Yatagarasu or Fires in Babahl, according to the prompt shown on your DS release. In Shih-na’s Movements, present Revolving Fireplace Wall on the fourth statement, then present the follow-up fireplace evidence when the game asks for proof that the wall was used by the Yatagarasu. This advances to Shih-na’s Rebuttal.
During Shih-na’s Rebuttal, present Counterfeit Bills on the statement claiming that nothing suspicious was found in Coachen’s office. Present Wire when the next contradiction is requested. When the investigation map appears, select the room marked with the green S icon.
After the short scene, choose Coat when asked which object should be examined. Present Babahlese Ink to identify the black substance on the coat. When asked how to prove the stain’s composition, choose Burn the coat. The coat burns green, establishing its connection to Babahlese Ink.
When Shih-na’s identity is challenged, present Ms. Yew’s Perfume. When the game asks whether the person shown is Kay or Shih-na, choose Neither person. The correct identity is then established through the final evidence request: present Babahlese Knife Handle. The confrontation supplies Hair Sticks, Trump Card, and Video Tape before transitioning to the next Allebahstian Embassy investigation.
The order matters because the game changes the available prompt after each successful contradiction. If a presentation is rejected, reload the pre-confrontation save rather than repeatedly spending the Truth Gauge.
- Present Shih-na’s profile.
- Present Photo of Yatagarasu or Fires in Babahl when requested.
- Use Revolving Fireplace Wall and the follow-up fireplace evidence.
- Present Counterfeit Bills, then Wire.
- Select the green S-marked room.
- Choose Coat, present Babahlese Ink, and choose Burn the coat.
- Present Ms. Yew’s Perfume, choose Neither person, and present Babahlese Knife Handle.
- Receive Hair Sticks, Trump Card, and Video Tape.
5. Solve the border-crossing investigation at the Allebahstian Embassy
At the start of the next Allebahstian Embassy segment, Babahlese Ink, Silhouette Lantern, Ms. Yew’s Perfume, and Amb. Palaeno’s Testimony are removed or cleared from the active evidence set. During the video-tape review, inspect and present the car’s flag near the headlight.
In Border-Crossing Weapons, present Babahl’s Primidux Statue on statement 3. Follow with Photo of Yatagarasu and Allebahst’s Primidux Statue when the game requests the paired statue evidence. In Movements in Allebahst, press statement 4 and then press the newly added statement 5. Present Passionflowers on the resulting sixth statement.
Inspect the passionflowers. When asked to show evidence connected with the sticks, present Hair Sticks. The game updates the evidence to Crossbow Arrows. Present or highlight the crossbow on the wall, above the rack of knives, when prompted.
In Border-Crossing, Part 2, press the first statement and then press the second statement to add the third. Present Wire on the new third statement. Select Rotary motion, then point to and present the ceiling fan. This establishes the pulley method used to move the statues between the two embassy offices.
When the game asks what the crossbow launched, present Crossbow Arrows. Then present Allebahst’s Primidux Statue. Rotate the statue and examine its head. Inspect the object that emerges to obtain Counterfeit Plate. The plate is the key physical proof that the statue was used to conceal the counterfeit-bill printing plate.
The story then returns to Theatrum Neutralis. During the tape review, present Coachen’s black card, inspect the blood on its back, present the card in the passenger’s pocket, and inspect the red-and-gold object reflected near the upper center of the image. This produces Alba’s Wound.
- Inspect the car flag during the video-tape review.
- Clear Border-Crossing Weapons and Movements in Allebahst.
- Present Passionflowers and update Hair Sticks to Crossbow Arrows.
- In Border-Crossing, Part 2, use Wire, Rotary motion, and the ceiling fan.
- Present Crossbow Arrows and Allebahst’s Primidux Statue.
- Examine the statue’s head and obtain Counterfeit Plate.
- Inspect the black card, its bloodstain, the passenger’s pocket, and the reflected object.
- Obtain Alba’s Wound.
6. Complete the final preparatory investigation at Theatrum Neutralis
At the beginning of this Theatrum Neutralis investigation, Passionflowers is removed from the active evidence set. The Logic facts Agitated Alba and Coachen’s Counterfeiting Op. are added. Examine the easel near the pamphlet table and then inspect the left bouquet, including the unusual flower near the red rose.
Deduce the left bouquet and present Allebahstian Knife to obtain Commemorative Photo. Connect Coachen’s Counterfeiting Op. with Renovations. When asked who had the most to gain, choose the third option to create Motive to Kill Coachen. Combine the remaining Logic facts and select Theatrum Neutralis on the map.
Franziska returns and provides Security Footage. Examine the 5:23 footage and inspect the Iron Infant doll in the recording to obtain Pushcart. This completes the preparatory investigation and begins Ambassador Alba’s alibi sequence.
Stop here for this chapter. The next section contains Alba’s Alibi, the subsequent alibi rebuttals, the border-crossing resolution, the Steel Samurai sequence, and the final exposure of the smuggling-ring leader.
- Record that Passionflowers has been removed.
- Create Agitated Alba and Coachen’s Counterfeiting Op.
- Obtain Commemorative Photo by examining the left bouquet and presenting Allebahstian Knife.
- Create Motive to Kill Coachen and select Theatrum Neutralis on the map.
- Obtain Security Footage and Pushcart.
- Confirm that the Alba alibi sequence has begun before continuing to Chapter 12.
Before you move on
- The Babahlese Embassy safe was opened, Cohdopian Paper Document was matched, and the opening confrontation was cleared.
- The first Allebahstian Embassy investigation produced Samurai Spear, Samurai Sword, Demasque II’s Note, Photo with Steel Samurai, Passionflowers, Allebahst’s Primidux Statue, and Samurai Dogs.
- Shared Chimney and Connected Fireplaces were created and all four Allebahstian rebuttal blocks were cleared.
- The Rose Garden produced Fountain Spouts and Photo of Yatagarasu; the Babahlese return produced Fires in Babahl, Wire, Shih-na’s Location, Revolving Fireplace Wall, and the connected-fireplace deductions.
- The Shih-na confrontation was completed with Shih-na’s profile, Photo of Yatagarasu or Fires in Babahl, Revolving Fireplace Wall, Counterfeit Bills, Wire, the green S-marked room, Coat, Babahlese Ink, Burn the coat, Ms. Yew’s Perfume, Neither person, and Babahlese Knife Handle.
- The second Allebahstian Embassy route included Hair Sticks becoming Crossbow Arrows, the ceiling-fan pulley deduction, the statue examination, Counterfeit Plate, and Alba’s Wound.
- The final Theatrum Neutralis investigation created Agitated Alba, Coachen’s Counterfeiting Op., Motive to Kill Coachen, and Commemorative Photo.
- Security Footage and Pushcart were obtained from the 5:23 recording.
- The player is ready for Chapter 12, beginning with Ambassador Alba’s alibi sequence.
References for this chapter
- Ace Attorney Investigations: Miles Edgeworth – Spoiler-Free Walkthrough by MKaykitkats, Nintendo DS
- Ace Attorney Investigations: Miles Edgeworth – Spoiler-Free Walkthrough by Shotgunnova, Nintendo DS
- Ace Attorney Investigations: Miles Edgeworth — Spoiler-Free Walkthrough
- Turnabout Ablaze Part 5 — Ace Attorney Investigations: Miles Edgeworth Walkthrough
- Ace Attorney Investigations: Miles Edgeworth/Turnabout Ablaze/Part 5-4 - Middle 3
- Ace Attorney Investigations: Miles Edgeworth — Turnabout Ablaze Walkthrough Index — StrategyWiki
Episode V — Turnabout Ablaze: final rebuttal, exposing the antagonist and endgame checks
This chapter begins after Chapter 11 has already completed the final Theatrum Neutralis investigation and the border-crossing sequence. Security Footage has been examined at 5:23 PM, Pushcart has been obtained, and the Organizer should already contain Counterfeit Plate and Amb. Alba’s Wound. Do not replay that investigation here. Begin directly with Ambassador Alba’s Alibi, then follow the remaining rebuttals and Logic deductions through the ending of Turnabout Ablaze on the original North American Nintendo DS release.
Prerequisite checkpoint: confirm the final investigation is already complete
Before starting this chapter, the preceding Episode V route must be finished: the Allebahstian Embassy investigation, the Rose Garden investigation, the returned Babahlese Embassy investigation, the Shih-na confrontation and the border-crossing sequence. Chapter 11 should already have handled the final Theatrum Neutralis investigation as well.
Check the Organizer before continuing. Security Footage should be present and already examined at 5:23 PM. Pushcart should be present. The border-crossing investigation should have produced Counterfeit Plate and Amb. Alba’s Wound. Earlier evidence such as Passionflowers may be removed automatically when the story advances; that is normal and is not a sign that the case has stalled.
If Ambassador Alba’s testimony has not started, return only to the most recent unresolved Episode V segment. Do not search the theater for Agitated Alba, Coachen’s Counterfeiting Op., Motive to Kill Coachen, Commemorative Photo or Pushcart again. Those steps belong to the preceding investigation and are not required a second time in this chapter.
- Security Footage is in the Organizer and was checked at 5:23 PM.
- Pushcart is in the Organizer.
- Counterfeit Plate was obtained during the border-crossing sequence.
- Amb. Alba’s Wound was obtained from the reviewed video evidence.
- The final Theatrum Neutralis investigation is complete.
- Ambassador Alba’s Alibi is the next active sequence.
Break Ambassador Alba’s first alibi
When Ambassador Alba gives his first alibi, press the testimony until the statement about Alba and Coachen being fellow smugglers produces an additional statement. On the new third statement concerning Alba’s possible motive, present DeMasque II’s Note. The note links Coachen to the planned theft and exchange of the real Allebahstian Primadux Statue, giving Alba a reason to silence his accomplice and protect the smuggling operation.
After this contradiction, the story moves into Alba’s Alibi, Part 2. Save before proceeding if the game gives you a convenient opportunity. The next testimony contains a major penalty risk, so use the exact contradiction rather than pressing randomly or presenting several related items.
- Press the testimony until the new third statement appears.
- Present DeMasque II’s Note on that motive statement.
- Save before Alba’s Alibi, Part 2 if a save opportunity is available.
Use the Commemorative Photo in Alba’s Alibi, Part 2
In Alba’s Alibi, Part 2, present Commemorative Photo on the first statement. Do not treat this as an either-or choice with another item. The photograph contradicts Alba’s claim that his last meeting with Coachen occurred at the stated location and establishes that Alba was holding the bouquet at the Theatrum Neutralis.
The bouquet matters because the concealed Allebahstian Knife was identified earlier as the weapon hidden among its flowers. The photograph therefore places Alba in contact with the weapon at the theater, undermining his claim that he had returned to Allebahst without meeting Coachen again. Continue through the dialogue until Alba’s Alibi, Part 3 begins.
- Present Commemorative Photo on the first statement of Alba’s Alibi, Part 2.
- Do not substitute an alternate evidence item for this contradiction.
- Allow the testimony to continue into Alba’s Alibi, Part 3.
Prove that Coachen’s body was transported in the Pushcart
In Alba’s Alibi, Part 3, present Pushcart on the fourth statement, the claim that Alba had no way to move Coachen’s body from the theater to Babahl. When the game requests supporting evidence, present Notes on Coachen’s Body.
Gumshoe then provides the cart for closer inspection. Examine the bottom interior of the Pushcart in the three-dimensional view and inspect the bloodstain. This physical trace connects the cart to the transport of Coachen’s body. The investigation does not end when Pushcart is presented; make sure the interior examination is completed before the next testimony begins.
- Present Pushcart on the fourth statement of Alba’s Alibi, Part 3.
- Present Notes on Coachen’s Body when requested.
- Inspect the inside bottom of the cart in three-dimensional view.
- Inspect the bloodstain inside the cart.
Establish the cross-embassy route
During Movements in Allebahst, press every statement. When the game asks how the smuggling route was possible, choose the Bilateral Symmetry option and select the matching empty gray courtyard on the Babahlese side of the map.
Present Fires in Babahl to connect the route with the fire damage and altered conditions in the neighboring embassy. Present Fountain Spouts to explain the water-route evidence. Then present Pick followed by Allebahstian Knife. These deductions establish how the weapon and body could be moved through the connected embassy structures rather than through the ordinary public route.
The order matters because each presentation develops the route explanation. If a later prompt does not appear, return to the testimony and press all statements before presenting evidence again.
- Press every statement in Movements in Allebahst.
- Choose the Bilateral Symmetry route option.
- Select the matching Babahlese courtyard on the map.
- Present Fires in Babahl.
- Present Fountain Spouts.
- Present Pick.
- Present Allebahstian Knife.
Resolve The Steel Samurai’s Show
The next testimony concerns The Steel Samurai’s Show. Press the third statement, then present Samurai Spear on the added statement about the unused Early Summer Rain Jab. The damaged spear explains why the expected move was not performed during the show.
When Alba is asked how he knew the name of the unused move, choose You saw it. After Alba admits entering the backstage waiting room, present Pushcart. This places him near the cart and the Samurai Dogs before the body was moved. Continue through the dialogue until the final Logic sequence appears.
- Press the third statement of The Steel Samurai’s Show.
- Present Samurai Spear on the added Early Summer Rain Jab statement.
- Choose You saw it.
- Present Pushcart when Alba’s backstage access is challenged.
Complete the final Logic deductions and identify Alba
The game adds Rising Sun Dogs, Samurai Dogs and Body in the pushcart to Logic. Combine Body in the pushcart with Samurai Dogs to create Samurai Dogs were removed. Then combine Rising Sun Dogs with Samurai Dogs were removed. Use these deductions to explain why the box was present without its original contents.
Examine the red sun symbol on the Rising Sun Dogs box. When asked whose blood is associated with it, present Quercus Alba’s profile. Then present Amb. Alba’s Wound. Alba’s injury explains how his blood reached the box during the struggle surrounding Coachen’s body.
When Alba argues that Coachen could not have carried a weapon through security, present Yatagarasu’s Key. Its concealed blade explains how Coachen could have possessed a weapon despite the security restrictions. This completes the reconstruction: Alba attacked Coachen at the theater, used the Pushcart to move the body, and relied on the connected route through the embassy complex with Shih-na’s assistance.
- Combine Body in the pushcart with Samurai Dogs.
- Combine Rising Sun Dogs with Samurai Dogs were removed.
- Examine the red sun symbol on the Rising Sun Dogs box.
- Present Quercus Alba’s profile.
- Present Amb. Alba’s Wound.
- Present Yatagarasu’s Key.
Finish the resolution, epilogue and credits
After Yatagarasu’s Key, allow the remaining dialogue and Alba’s breakdown to play. Do not stop when the last accusation is accepted. The game continues through the legal resolution, the collapse of Alba’s cover story and the resolution of the smuggling-ring storyline involving the former Cohdopia region.
Continue through the complete epilogue and credits. The campaign completion check is the finished ending sequence, not a particular episode-menu display. After the credits, keep a backup save if the cartridge or DS environment allows it. This provides a safe point for replaying a cleared episode or checking optional dialogue without risking the completed campaign.
- Alba’s breakdown has finished.
- The legal resolution has played.
- The Cohdopia epilogue has played.
- The credits have been viewed completely.
- A completed-campaign backup save has been retained.
Before you move on
- The final Theatrum Neutralis investigation was already completed in the preceding chapter.
- Security Footage was examined at 5:23 PM before this chapter began.
- Pushcart, Counterfeit Plate and Amb. Alba’s Wound are already in the Organizer.
- DeMasque II’s Note contradicted Alba’s motive denial.
- Commemorative Photo was presented on the first statement of Alba’s Alibi, Part 2.
- Pushcart and Notes on Coachen’s Body established the body-transport method.
- The cart’s interior bloodstain was inspected.
- Bilateral Symmetry, the Babahlese courtyard, Fires in Babahl, Fountain Spouts, Pick and Allebahstian Knife resolved the cross-embassy route.
- Samurai Spear and Pushcart resolved The Steel Samurai’s Show.
- Body in the pushcart and Samurai Dogs were combined to create Samurai Dogs were removed.
- Rising Sun Dogs and Samurai Dogs were removed were combined in Logic.
- Quercus Alba’s profile, Amb. Alba’s Wound and Yatagarasu’s Key were presented.
- Alba’s breakdown and the legal resolution were viewed.
- The Cohdopia epilogue and complete credits were viewed.
- A backup save was retained after campaign completion.
References for this chapter
- Ace Attorney Investigations: Miles Edgeworth – Spoiler-Free Walkthrough by Shotgunnova, Nintendo DS
- Ace Attorney Investigations: Miles Edgeworth – Guide and Walkthrough by The_Lost_Gamer, Nintendo DS
- Ace Attorney Investigations: Miles Edgeworth — Turnabout Ablaze Walkthrough Index — StrategyWiki
- Ace Attorney Investigations: Miles Edgeworth — Turnabout Ablaze Part 5-7: End 3 — StrategyWiki
Optional content, missed lines and epilogue variants
The original North American Nintendo DS release contains optional conversations, examinations, evidence presentations, and extra reactions inside active investigation segments. It also has a case-selection feature for replaying episodes that have already been cleared. This is whole-episode replay: it does not select a particular investigation, testimony, checkpoint, or room, and it does not turn the completed game into a permanently explorable map. Finish the main campaign first, then use targeted saves or a full episode replay to recover missed material.
Finish the campaign before cleanup
Complete the five episodes in the original USA DS order: Turnabout Visitor, Turnabout Airlines, The Kidnapped Turnabout, Turnabout Reminiscence, and Turnabout Ablaze. The cases form one connected smuggling-ring storyline, so optional reactions should not interrupt the main objective of reaching the fixed resolution of Turnabout Ablaze.
Before the final major confrontation in Turnabout Ablaze, create a separate save and leave it untouched. Keep playing after the last successful presentation through the case-closed dialogue, aftermath scenes, ending sequence, epilogue material, and credits. Resetting immediately after the final objection can leave you without a clear record that you watched the complete ending presentation.
- Turnabout Visitor is cleared.
- Turnabout Airlines is cleared.
- The Kidnapped Turnabout is cleared.
- Turnabout Reminiscence is cleared.
- Turnabout Ablaze reaches its final resolution.
- A pre-final-confrontation backup save is retained.
Use case selection as whole-episode replay
After an episode has been cleared, the DS title-screen case-selection feature can be used to start that completed episode again. The selected case begins from its opening sequence. It is not a chapter selector, checkpoint selector, or menu of individual investigation segments.
Use this feature when a missed conversation occurred near the beginning of an episode or when no suitable investigation save remains. You must replay the required dialogue, movement, examinations, Logic connections, deductions, and rebuttals until reaching the scene containing the missed interaction.
For a late optional line, an earlier in-episode save is faster and safer. If that save does not exist, replay the cleared episode from its beginning. Do not expect case selection to place Edgeworth directly at a late investigation, and do not expect a cleared location to remain available for free roaming after the story has moved on.
- Select only an episode that has already been cleared.
- Treat case selection as a restart from the episode opening.
- Use an investigation save for late cleanup whenever possible.
- Do not expect arbitrary checkpoint or room selection.
- Do not treat the completed game as a free-roaming post-game map.
Check optional interactions during active investigations
When Edgeworth enters a new location, exhaust every available Talk topic before leaving. Use Partner whenever it appears, then Examine every newly available hotspot. This includes objects revealed after a Logic connection, Deduction, confrontation, or Little Thief reconstruction.
Return to characters and objects after the investigation state changes. A new conversation or examination may appear after evidence is acquired, a profile is updated, a testimony is challenged, or a new conclusion is established. Gumshoe and Kay are especially worth checking when they are present, but their extra exchanges are scene-specific; a recurring character is not guaranteed to have optional dialogue in every episode or location.
Distinguish this conditional dialogue from post-case cleanup. The game generally expects the interaction to be triggered while the relevant investigation segment is active. Merely revisiting a completed location later will not recreate every earlier conversation. Present evidence selectively: related presentations can produce extra reactions, but unrelated guesses can reduce the Truth Gauge during a confrontation.
- Exhaust all current Talk topics.
- Use Partner whenever the option is available.
- Examine every new hotspot after a major investigation update.
- Recheck Gumshoe, Kay, and other characters who are present after the story state changes.
- Avoid unrelated evidence presentations when the Truth Gauge is low.
Recover a missed line with the correct save
If you realize that you skipped a conversation or examination, load the most recent save made before that interaction. Once the scene is active, check options in this order: Partner, the principal witness or suspect, other characters currently present, newly unlocked Examine targets, and relevant Present options.
If you have no usable save, choose the cleared episode from case selection and replay from the beginning. Save at major investigation transitions during that replay so future cleanup attempts do not require another complete restart. Do not overwrite the clean pre-rebuttal save merely to test an optional presentation.
If an exploratory presentation or incorrect rebuttal answer lowers the Truth Gauge, reload the clean save. Optional reactions are never worth carrying a damaged gauge into a required confrontation. Successful investigation progress can restore the gauge, but reloading is the dependable recovery method when a mistake leaves little margin.
- Load a save from before the missed interaction if possible.
- Replay the entire cleared episode only when no suitable save remains.
- Create additional saves at major investigation transitions.
- Keep a clean pre-rebuttal save separate from exploratory saves.
- Reload after a risky or incorrect presentation.
Follow a two-pass cleanup plan
Make the first cleanup pass during the main story. At every active investigation location, exhaust Talk, Partner, Examine, Logic, Deduce, and sensible Present options before advancing. This catches ordinary optional reactions without requiring a later full replay.
Make the second pass only for conditional material unlocked by a later story change. Return after the relevant evidence acquisition, Logic connection, Little Thief update, profile addition, or confrontation. Recheck the affected character or object, then resume the required route.
Do not hunt every possible reaction before completing Turnabout Ablaze. The efficient order is to finish the five-episode campaign, preserve the completed save and the pre-final backup, then replay only the episodes and scenes connected to the lines you actually missed.
- First pass: check ordinary options during each active location.
- Second pass: revisit only after the required story-state change.
- Use targeted saves instead of restarting without a reason.
- Finish the main campaign before broad optional cleanup.
- Keep completed and pre-final saves separate.
Verify the fixed ending and completion state
The original DS campaign has five episodes and one fixed concluding resolution. Completion does not require finding a hidden ending, alternate epilogue route, bonus case, gallery, or remaster-only feature. The required endpoint is the resolution of Turnabout Ablaze followed by the closing scenes and credits.
After the credits, retain the completed campaign save. The case-selection feature can then be used for whole-episode replay if you want to recover missed dialogue or examinations. It should not be described as chapter-by-chapter cleanup, checkpoint selection, or permanent access to earlier locations.
- All five original DS episode titles are cleared.
- Turnabout Ablaze reaches its case-closed resolution.
- The closing aftermath and credits are viewed.
- A completed save and pre-final backup are retained.
- Cleanup uses an earlier save or whole-episode replay.
- No alternate ending, bonus episode, gallery, or remaster feature is counted as required.
Before you move on
- Turnabout Visitor, Turnabout Airlines, The Kidnapped Turnabout, Turnabout Reminiscence, and Turnabout Ablaze are cleared.
- The final Turnabout Ablaze resolution, aftermath, and credits have been viewed.
- At least one pre-final-confrontation save remains available.
- Missed optional material is recovered from an earlier save or by replaying the relevant cleared episode from its beginning.
- Talk, Partner, Examine, Logic, Deduce, and sensible Present options were checked after major story-state changes.
- The DS case-selection feature is understood as whole-episode replay only.
- No free-roaming post-game mode, checkpoint selector, alternate epilogue, gallery, or bonus episode is being counted as necessary for USA DS completion.
References for this chapter
- Ace Attorney Investigations: Miles Edgeworth – Spoiler-Free Walkthrough by MKaykitkats, Nintendo DS
- Ace Attorney Investigations: Miles Edgeworth – Guide and Walkthrough by The_Lost_Gamer, Nintendo DS
- Ace Attorney Investigations: Miles Edgeworth/Gameplay — StrategyWiki
- Ace Attorney Investigations: Miles Edgeworth — DS episode-selection screenshot, MobyGames
- Ace Attorney Investigations: Miles Edgeworth, Wikipedia
Recovery, troubleshooting and finishing checklist
Use this chapter when progress stalls, the Truth Gauge is low, a required clue seems to be missing, or you are preserving a completed North American Nintendo DS campaign. The safest approach is to stop guessing, save before risky testimony, inspect the newest investigation area, review the Organizer and Logic lists, and reload a nearby save after repeated mistakes. The original DS campaign contains five episodes: Turnabout Visitor, Turnabout Airlines, The Kidnapped Turnabout, Turnabout Reminiscence, and Turnabout Ablaze.
1. Stop guessing when the Truth Gauge is low
A wrong evidence presentation, incorrect Logic connection, failed deduction, or bad choice reduces the Truth Gauge. If the gauge is already low, stop testing unrelated evidence. Press Start to open the DS save screen and save before beginning another uncertain sequence. The DS controls reference Start for saving, while the Organizer and Logic functions are available through the R and L buttons or their touchscreen panels.
If the gauge reaches zero, the current attempt ends. Reload the latest save made before the testimony, deduction, or confrontation and repeat the section carefully. Do not keep cycling through evidence in the hope that one item will work. The game penalizes incorrect presentations and incorrect Logic pairings, so repeated guesses can turn a recoverable situation into a game over.
Successful investigation completion restores part of the gauge, and clearing an entire episode restores it completely. This means a low gauge is not permanent campaign damage, but recovery happens through correct progress, not by wandering randomly through earlier rooms.
- Save with Start before a major testimony or final confrontation.
- Read the full testimony before presenting anything.
- Reload after repeated wrong presentations instead of spending the remaining gauge.
- Do not assume an incorrect Logic connection is harmless.
2. Recover a clue that appears to be missing
Return to the most recent location where the story advanced or where a new character arrived. Examine every available hotspot again, including objects that seemed decorative. Speak with every character whose conversation option remains available, and finish all currently unlocked topics before leaving.
Open the Organizer after each new examination. Evidence may contain additional information when inspected, and a clue can become useful only after Edgeworth or a partner discusses it. Profiles also update as people are met or mentioned. A locked route normally means that an examination, conversation, presentation, deduction, or Logic connection is unfinished; it does not by itself prove that the cartridge or emulator is faulty.
When the game moves Edgeworth automatically, follow the current story location first rather than travelling randomly through the map. If Gumshoe, Kay, or another partner is present, use the partner command. Partner conversations can provide hints and can also be part of the intended progression. If a scene contains a close-up examination, move the cursor over the entire view and inspect every highlighted object before trying Logic again.
- Re-examine every visible object in the newest scene.
- Talk to every available witness, officer, partner, or assistant.
- Inspect newly added evidence in the Organizer.
- Finish every available conversation topic.
- Use the partner command whenever a partner is present.
- Return to Logic only after the newest scene is exhausted.
3. Rebuild Logic connections methodically
Open Logic Mode and read the complete wording of every available thought before combining anything. Compare facts by event, location, object, timing, movement, or sequence. Do not pair thoughts merely because they mention the same person. The intended connection should explain an inconsistency or show why a new line of investigation is possible.
If a pairing fails, do not immediately try every remaining combination. First inspect the newest evidence, revisit the location that supplied the latest fact, and check for a new conversation or hotspot. Specialist DS walkthroughs organize their directions around the game’s investigation and save points because the intended Logic pair often becomes clear only after the surrounding scene has been completed.
During a deduction, first locate the area where the Deduce command is available. Move the cursor over the exact contradictory detail, activate Deduce, and then present the evidence that explains it. A correct item aimed at the wrong image detail can still fail. If the result is rejected, reload rather than testing several other items.
- Read both thoughts completely before connecting them.
- Match facts by concrete details rather than names alone.
- Inspect and rotate evidence when the Organizer allows it.
- Use Deduce on the precise highlighted contradiction.
- Reload after an uncertain deduction.
4. Recover from a stalled rebuttal
Read every statement in the testimony before choosing evidence. The correct target is the individual sentence that conflicts with a specific fact, not necessarily the witness’s overall conclusion. Compare each sentence with evidence descriptions, crime-scene findings, earlier testimony, and any new detail revealed by pressing the statement.
Press a statement when the game offers that option. Pressing may add or revise testimony, and the new sentence can become the actual contradiction. Some confrontations also require a choice, an objection, a profile, or a follow-up presentation before the decisive evidence becomes available. Do not present evidence against a sentence that has been replaced by revised testimony.
After a rejected presentation, reload the save made before that testimony whenever possible. On the retry, inspect the proposed evidence again and identify the exact statement it disproves. Presenting every vaguely related item is the least reliable method because each incorrect attempt can reduce the Truth Gauge.
- Read all statements before acting.
- Press statements when required.
- Identify the exact contradictory sentence.
- Check whether the game requests a choice, profile, or follow-up response.
- Reload a pre-testimony save after an uncertain presentation.
5. Confirm the five-episode campaign
The original North American DS campaign is complete only after clearing Turnabout Visitor, Turnabout Airlines, The Kidnapped Turnabout, Turnabout Reminiscence, and Turnabout Ablaze. Do not substitute the later collection’s presentation features, gallery content, or interface terminology for the DS release. The DS-specific walkthrough structure confirms these five episode names and separates the game into investigation and confrontation sections.
After the fifth episode’s final deductions and presentations, allow the resolution, epilogue scenes, and credits to play. Do not treat reaching the last successful presentation as the completion point. The final story scenes establish that the smuggling-ring storyline has reached its conclusion, and the credits are the practical end-of-campaign check.
The original DS save command is accessed with Start. Do not count on a modern multi-slot system when preserving a cartridge campaign. Save at a safe point after the final sequence if the game offers one, then verify that the completed save loads normally. If you need an archival backup, make an external cartridge save backup or emulator copy using the tools appropriate to your setup; do not overwrite the only usable campaign save while experimenting.
- Turnabout Visitor is cleared.
- Turnabout Airlines is cleared.
- The Kidnapped Turnabout is cleared.
- Turnabout Reminiscence is cleared.
- Turnabout Ablaze is cleared.
- The final resolution and epilogue have finished.
- The credits have been viewed.
- A completed campaign save has been created and successfully loaded.
- An external backup or pre-final-confrontation copy is preserved if your setup supports one.
- Do not use an episode menu as the required proof of completion.
6. Consult references without losing the mystery
Start with a Nintendo DS-specific manual or control reference when the problem concerns saving, movement, the Organizer, Logic, partner commands, or the touchscreen. The DS control layout uses the D-pad for movement and menu navigation, A for confirmation, B for cancelling, X for presenting or deducing, L for Logic or pressing statements, R for the Organizer, Y for partner or microphone functions, and Start for saving.
For a single blocked step, use a spoiler-free walkthrough and search by the exact episode and current location. The GameFAQs DS guides divide the campaign into investigations and list required examinations, Logic connections, deductions, rebuttals, and save points. Read only far enough to identify the next action, then return to the game.
If you want a complete solution, compare two DS-labelled references when an instruction is unclear. Avoid relying on an unlabelled video, forum answer, or later collection guide when it conflicts with the Organizer, current testimony, or the game’s own prompts.
- Use a DS-specific control reference first.
- Prefer a spoiler-free walkthrough for one blocked action.
- Confirm that a full guide identifies the Nintendo DS version.
- Cross-check disputed progression with a second specialist DS source.
- Reveal only the next action if you want to preserve the mystery.
Before you move on
- Turnabout Visitor is cleared.
- Turnabout Airlines is cleared.
- The Kidnapped Turnabout is cleared.
- Turnabout Reminiscence is cleared.
- Turnabout Ablaze is cleared.
- The smuggling-ring storyline reaches its final resolution.
- The epilogue scenes have finished.
- The credits have been viewed.
- A completed-campaign save has been created and successfully loaded.
- At least one preservation copy remains: an external backup where supported, or a separate pre-final-confrontation save state or equivalent backup on a non-cartridge setup.
- The Organizer has been reviewed for the current late-game evidence and profiles, while recognizing that normal story progression can remove or update evidence.
- No unresolved Logic entry, examination hotspot, conversation topic, or active testimony remains in the final sequence.
- Completion is established by the complete five-episode story and ending sequence, not by an assumed episode-selection menu.
References for this chapter
- Ace Attorney Investigations: Miles Edgeworth – Spoiler-Free Walkthrough by MKaykitkats, Nintendo DS
- Ace Attorney Investigations: Miles Edgeworth – Spoiler-Free Walkthrough by Shotgunnova, Nintendo DS
- Ace Attorney Investigations: Miles Edgeworth – Guide and Walkthrough by The_Lost_Gamer, Nintendo DS
- Ace Attorney Investigations: Miles Edgeworth DS save-game listing, North American version
Finishing up
Clear Turnabout Visitor, Turnabout Airlines, The Kidnapped Turnabout, Turnabout Reminiscence and Turnabout Ablaze in the original Nintendo DS USA release.
Complete the final Alba sequence and allow the post-case resolution, epilogue and credits to play.
Confirm that the story has reached its completed post-ending state and preserve a completed save.
Use an earlier backup save for optional dialogue or replay only if the DS release and current save structure make that available; do not require an unverified episode-menu check.
The Truth Gauge stability condition is optional play advice, not a completion requirement.
Choose your next gameScreenshots & video
Game imagery for reference. Follow the written chapters above for the route and strategies.
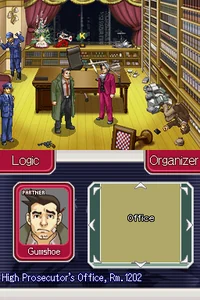
Sources & references
Our original guide draws on the references below. Check the edition at the top of this page before following controls or unlock requirements.
- Ace Attorney Investigations: Miles Edgeworth – Spoiler-Free Walkthrough by MKaykitkats, Nintendo DS
- Ace Attorney Investigations: Miles Edgeworth – Spoiler-Free Walkthrough by Shotgunnova, Nintendo DS
- Ace Attorney Investigations: Miles Edgeworth - Guide and Walkthrough - DS - By Burner
- Ace Attorney Investigations: Miles Edgeworth – Controls
- Ace Attorney Investigations: Miles Edgeworth – Strategy Guide and Walkthrough
- Ace Attorney Investigations: Miles Edgeworth – Nintendo DS Screenshots
- Ace Attorney Investigations: Miles Edgeworth DS save-game listing, North American version
- Ace Attorney Investigations: Miles Edgeworth – Guide and Walkthrough by The_Lost_Gamer, Nintendo DS
- Ace Attorney Investigations: Miles Edgeworth, Wikipedia
- Ace Attorney Investigations: Miles Edgeworth — Truth Gauge and Little Thief mechanics summary
- Ace Attorney Investigations: Miles Edgeworth — Penalty and Truth Gauge reference
- Ace Attorney Investigations: Miles Edgeworth - Guide and Walkthrough - DS - By warfreak
- Turnabout Visitor — Ace Attorney Wiki
- All Cases Guide — Ace Attorney Investigations: Miles Edgeworth, Speedrun.com
- Turnabout Visitor — Transcript
- Turnabout Visitor pt2 — Ace Attorney Investigations: Miles Edgeworth Walkthrough
- Capcom News: TGS 2009 Ace Attorney Investigations: Miles Edgeworth; Nintendo DS platform and February 16, 2010 North American release
- Ace Attorney Investigations 2: Prosecutor’s Gambit — separate sequel containing The Inherited Turnabout
- Ace Attorney Investigations: Miles Edgeworth — Turnabout Airlines overview and case structure, StrategyWiki
- Ace Attorney Investigations: Miles Edgeworth — Turnabout Airlines, Part 2-1, StrategyWiki
- Ace Attorney Investigations: Miles Edgeworth — Turnabout Airlines, Part 2-2, StrategyWiki
- Ace Attorney Investigations: Miles Edgeworth — Turnabout Airlines, Part 2-3, StrategyWiki
- Ace Attorney Investigations: Miles Edgeworth — Turnabout Airlines, Part 2-4, StrategyWiki
- The Kidnapped Turnabout Part 1 — Ace Attorney Investigations: Miles Edgeworth Walkthrough, Neoseeker
- Ace Attorney Investigations: Miles Edgeworth/The Kidnapped Turnabout — StrategyWiki
- Ace Attorney Investigations: Miles Edgeworth — The Kidnapped Turnabout, Part 3-1: Beginning
- The Kidnapped Turnabout — Transcript, Part 2
- Ace Attorney Investigations: Miles Edgeworth — The Kidnapped Turnabout, Part 3-3: Middle 2
- Ace Attorney Investigations: Miles Edgeworth/Turnabout Reminiscence/Part 4-1 - Beginning
- Turnabout Reminiscence Part 4 — Ace Attorney Investigations: Miles Edgeworth Walkthrough
- Ace Attorney Investigations: Miles Edgeworth Spoiler-Free Walkthrough
- Turnabout Reminiscence — Ace Attorney Wiki
- Ace Attorney Investigations: Miles Edgeworth — Spoiler-Free Walkthrough
- Turnabout Ablaze Part 5 — Ace Attorney Investigations: Miles Edgeworth Walkthrough
- Ace Attorney Investigations: Miles Edgeworth/Turnabout Ablaze/Part 5-4 - Middle 3
- Ace Attorney Investigations: Miles Edgeworth — Turnabout Ablaze Walkthrough Index — StrategyWiki
- Ace Attorney Investigations: Miles Edgeworth — Turnabout Ablaze Part 5-7: End 3 — StrategyWiki
- Ace Attorney Investigations: Miles Edgeworth/Gameplay — StrategyWiki
- Ace Attorney Investigations: Miles Edgeworth — DS episode-selection screenshot, MobyGames
About the game & collecting notes
- Platform
- Nintendo DS
Step through all five linked episodes of Ace Attorney Investigations: Miles Edgeworth (Nintendo DS, USA).
Darryl Polo
Darryl Polo loves tinkering with emulation and revisiting retro games. He enjoys exploring how old favorites play on different setups and sharing what he learns along the way. At Joking Joystick, he writes about the games, hardware, and small discoveries that keep the hobby fun.
Our editorial standardsFound a step that needs another look? Help us improve this guide.